


-
Posts
189 -
Joined
-
Last visited
-
Days Won
14 -
Donations
0.00 USD
Content Type
Schools and Courses
Profiles
Events
Forums
Posts posted by A. Fortnum
-
-
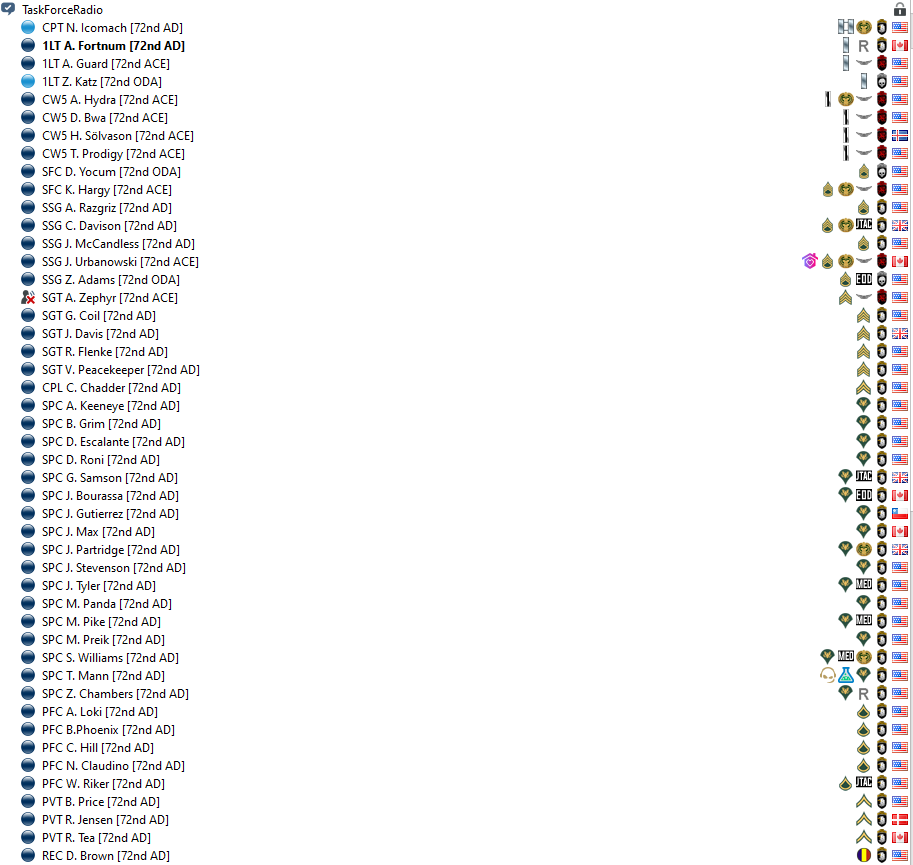
ATTENDANCE:
AAR: Security needs to be done as soon as we're loaded in.
FINAL NOTES:
// S1 DATA //
AIRBORNE JUMP CONDUCTED: N
PROMOTIONS: None
AWARDS: None
RECRUIT TRANSFERS:
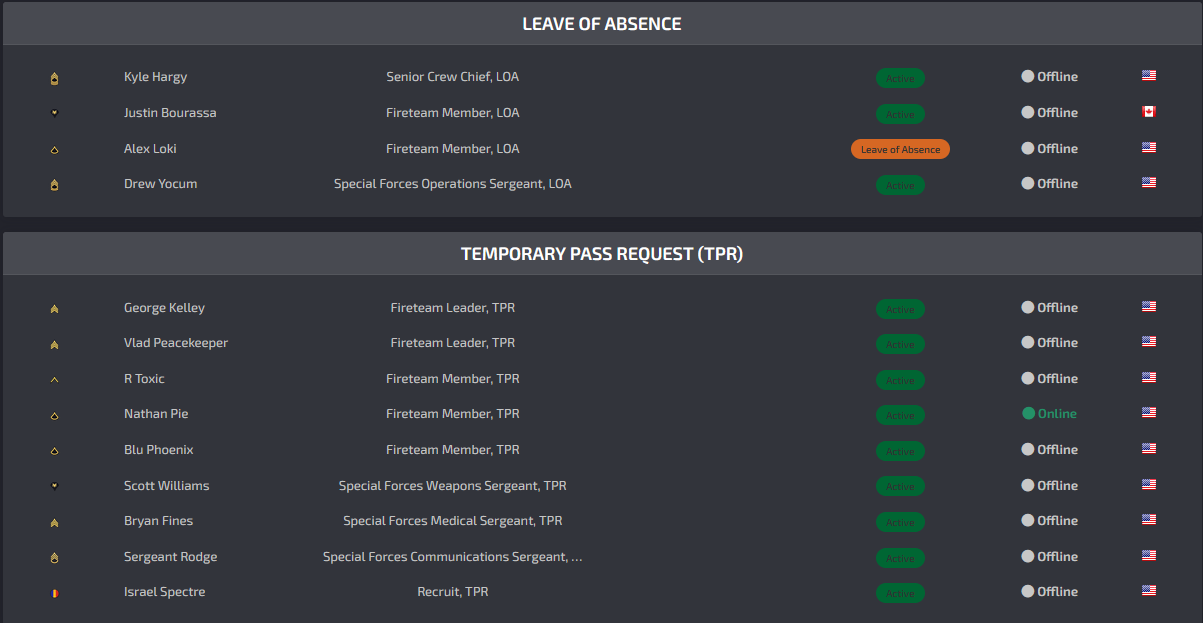
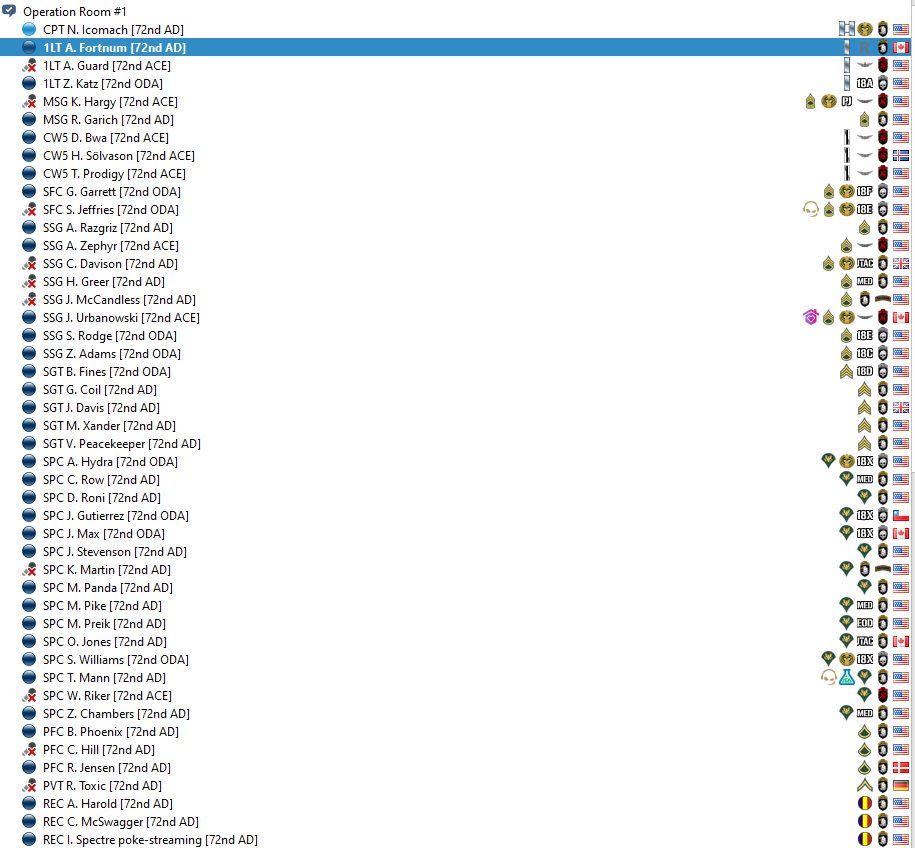
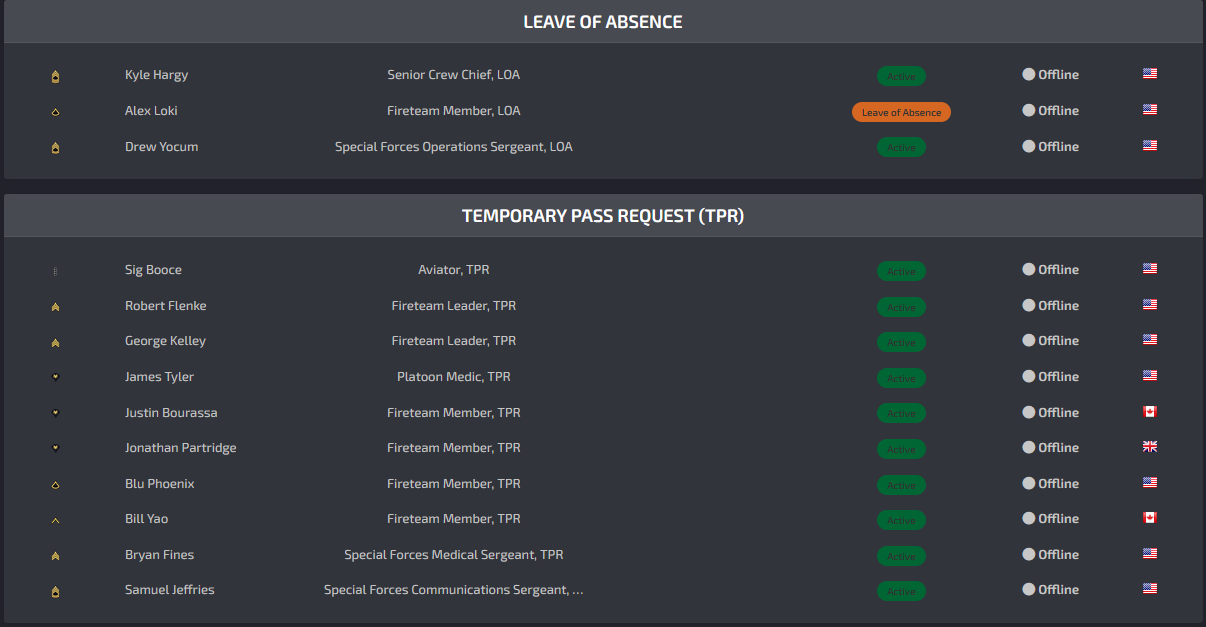
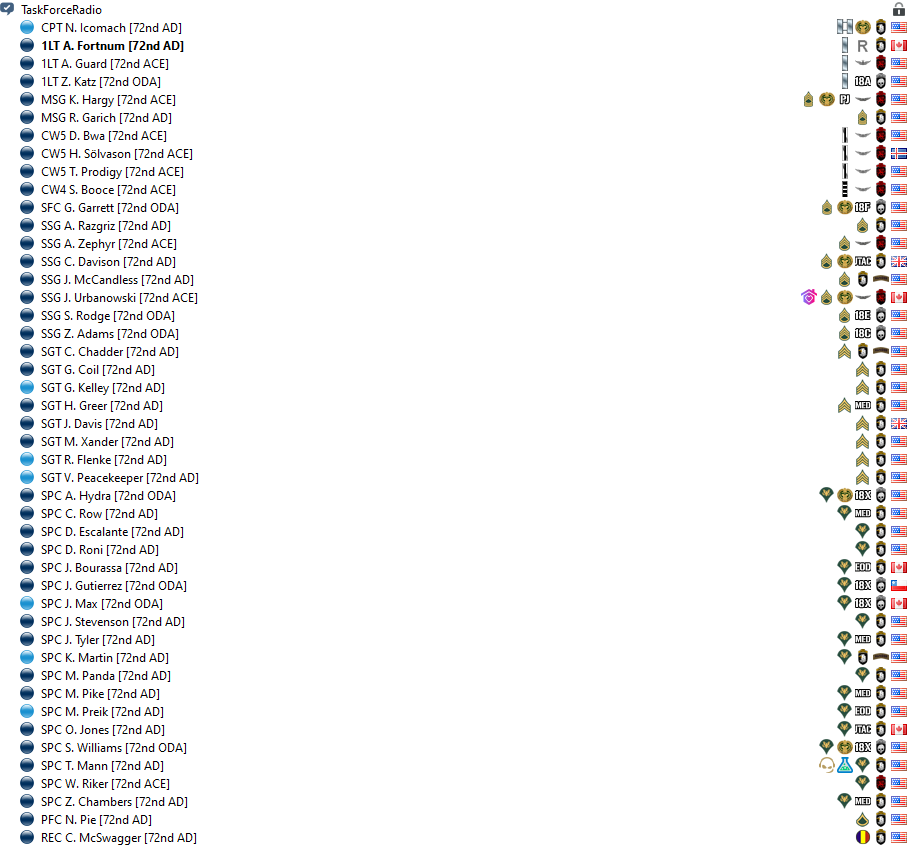
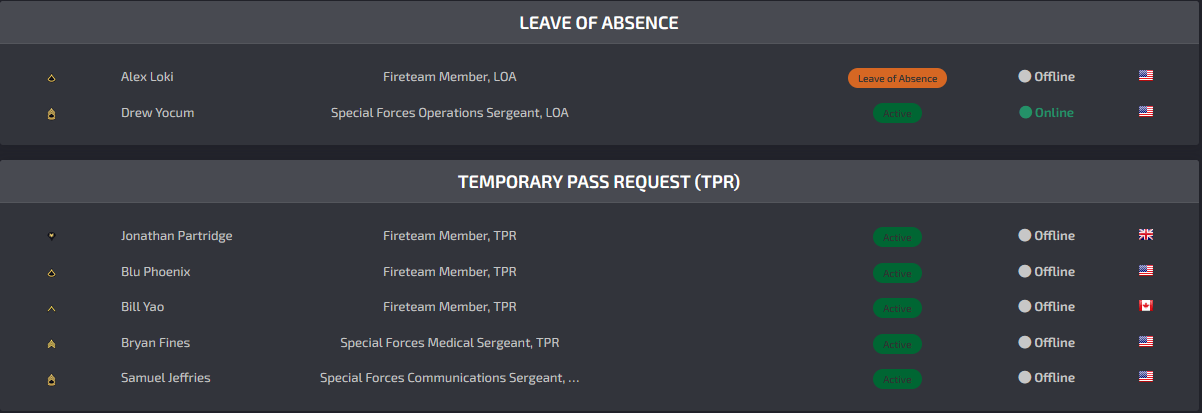
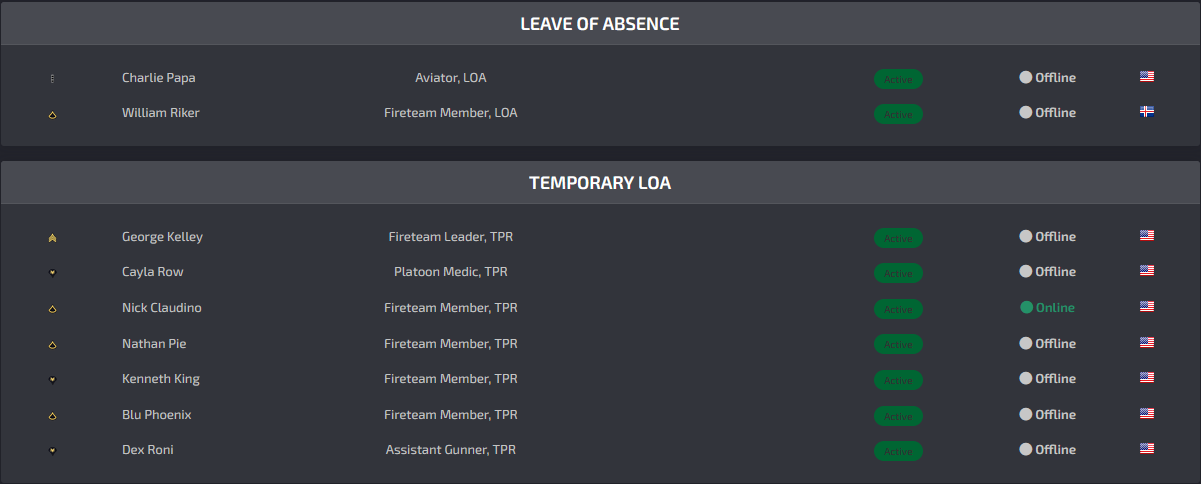
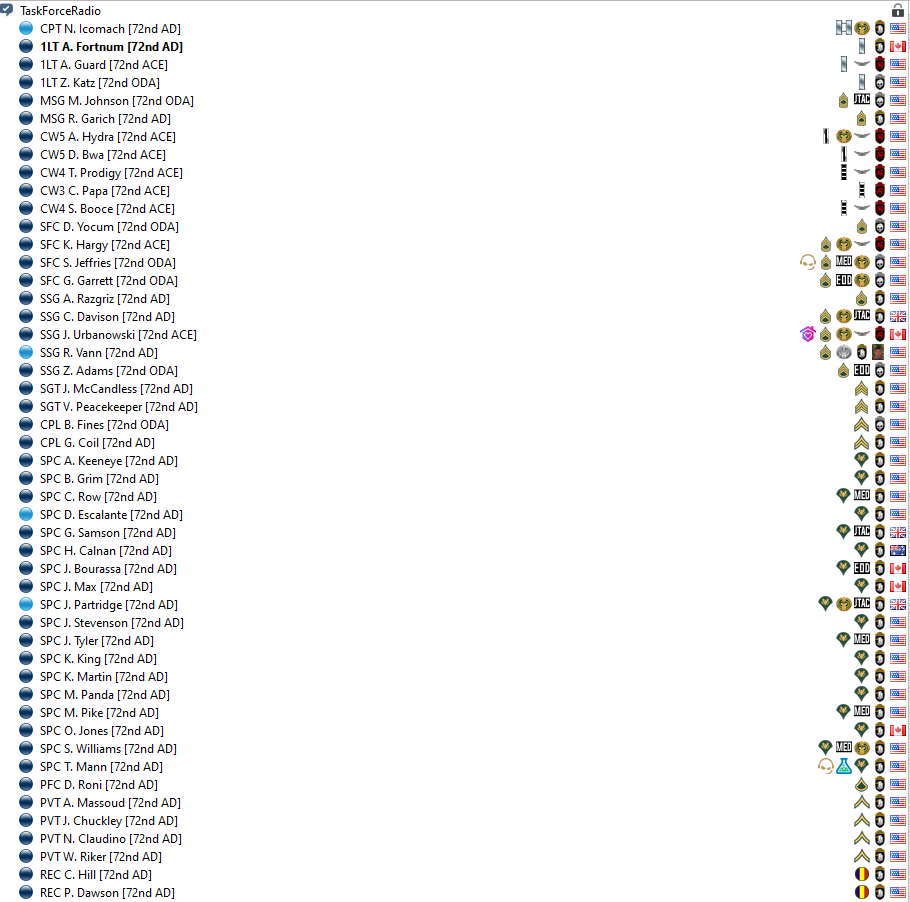
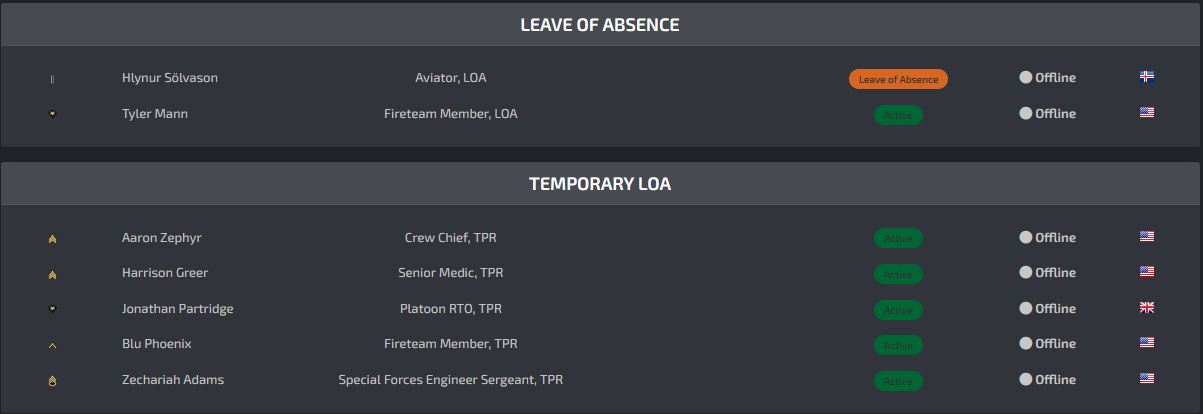
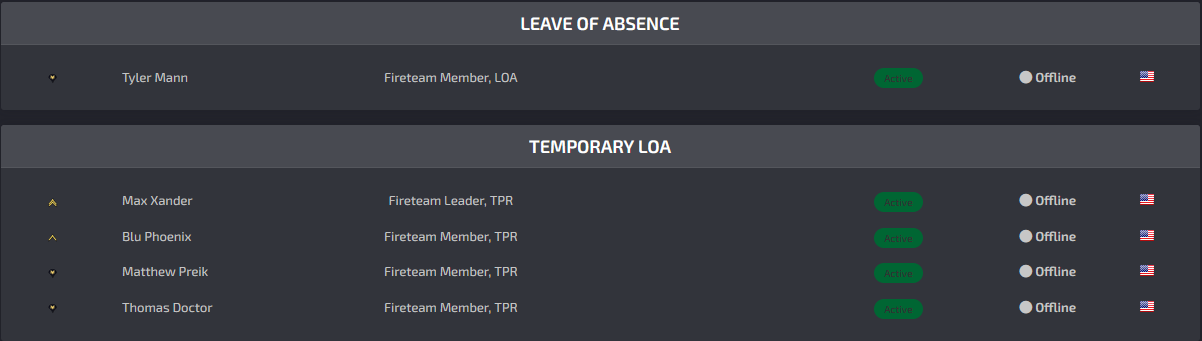
LOA/TPR SCREENSHOT:
-
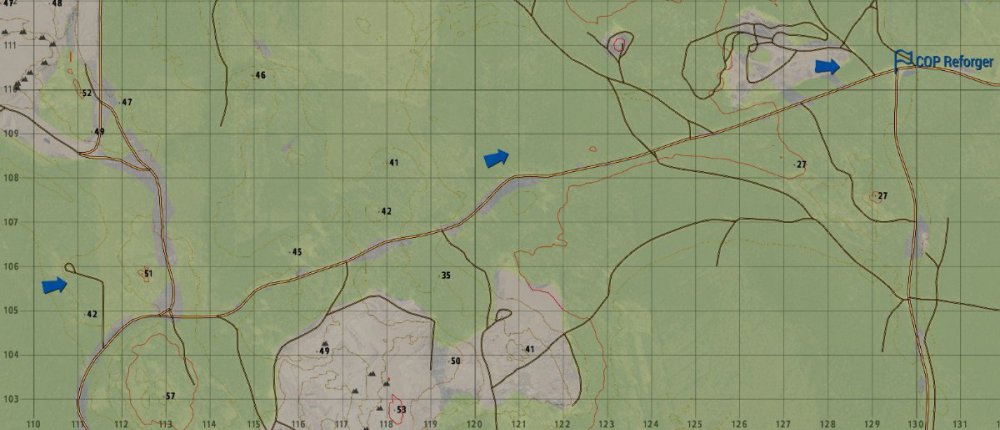
TIME: 21MAY2022 @ 0600
WEATHER: Overcast
TERRAIN: Forest
SITUATION:
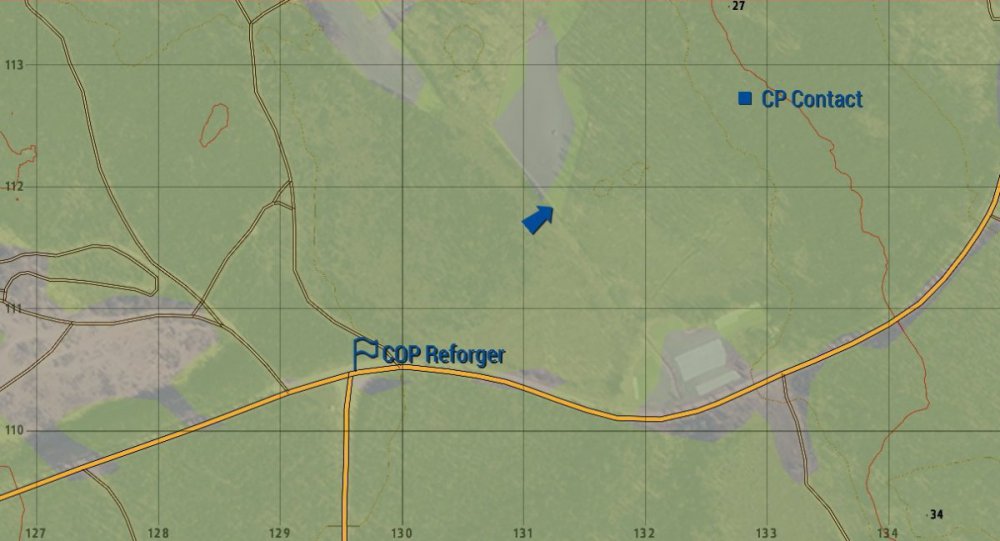
The 72nd airborne is currently holding the crossroads at 129-110, hereby designated COP Reforger. They will be conducting hit and run attacks to secure the immediate area around the COP, and secure resources.Friendly Forces:
72nd ODA, 72nd ACEHigher Command’s Mission:
Avenger company will destroy 2 SAM sites, as well as a hostile division that is preparing for an attack. They will also secure a helicopter and some light transport vehicles.MISSION
Execution: This Mission will be carried out in 3 Phases
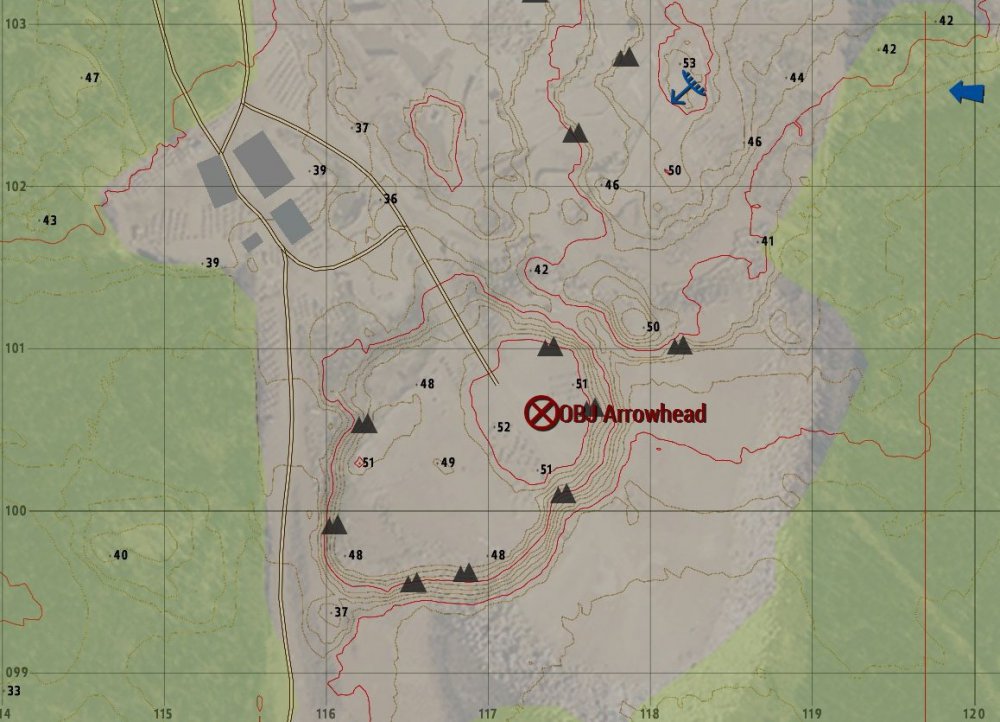
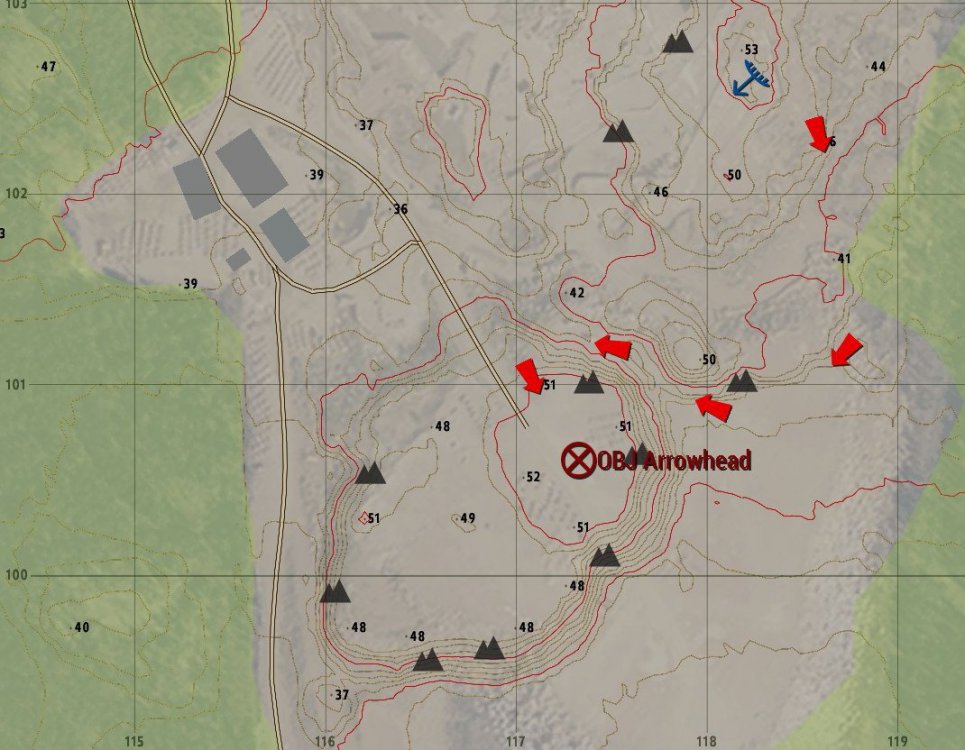
Phase 1A:
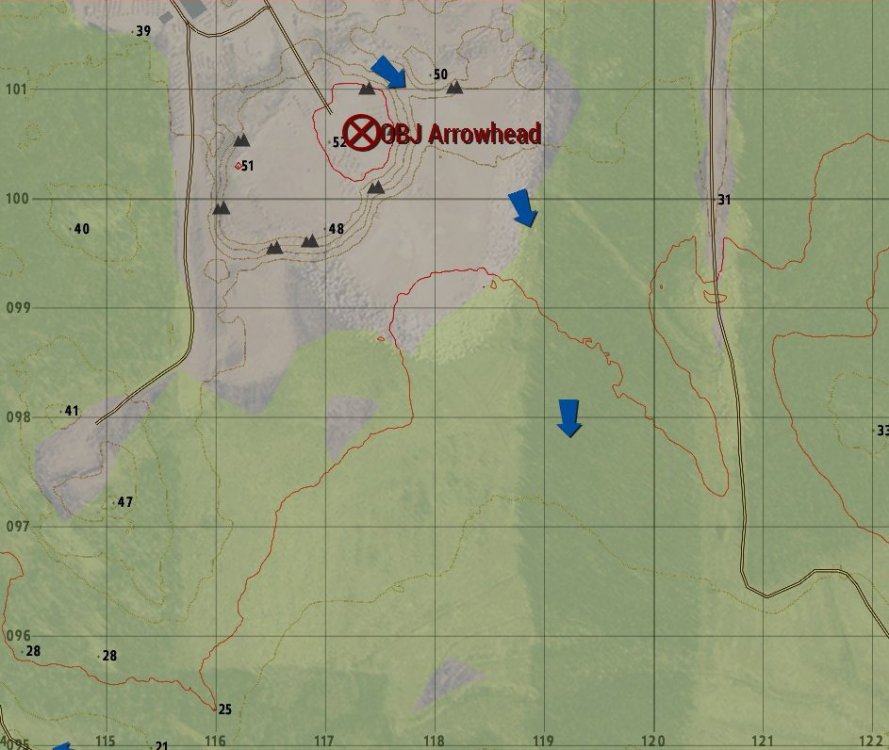
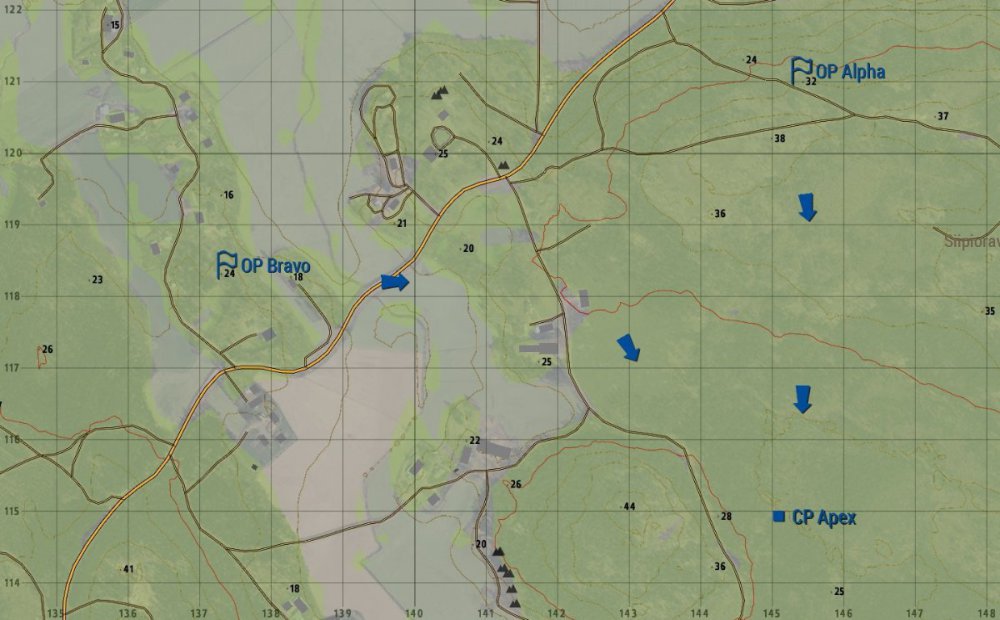
Phase 1A will consist of 1-1, 1-2, ODA Team 1, and half of ACE, moving to destroy the enemy SAM site at 117-100 designated OBJ Arrowhead. They will depart Southwest through the woods to approach the objective from the East. 1-2 will establish a firing position at 1181-1026 with the ODA team, while 1-1 moves further South to a point of low ground to approach the objective. When 1-1 is ready, or the enemy engages, 1-2 and ODA will begin engaging targets, while 1-1 focuses on destroying the SAM site that is located at this objective. Once the SAM sites are destroyed or charges have been placed on them, all teams will exit the area to the South.

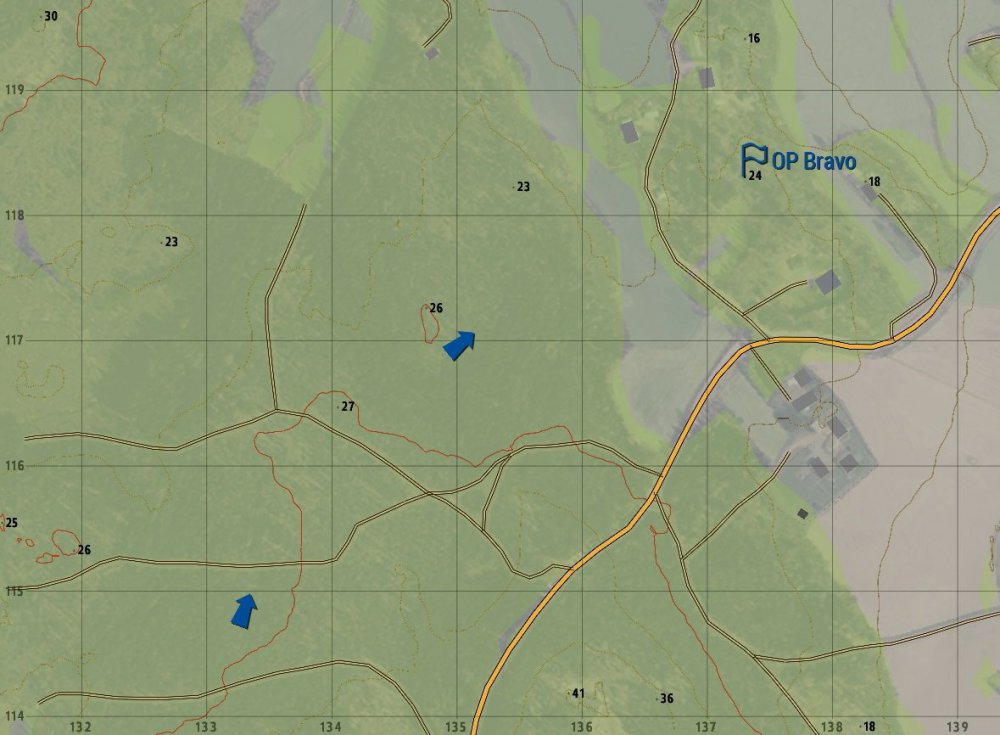
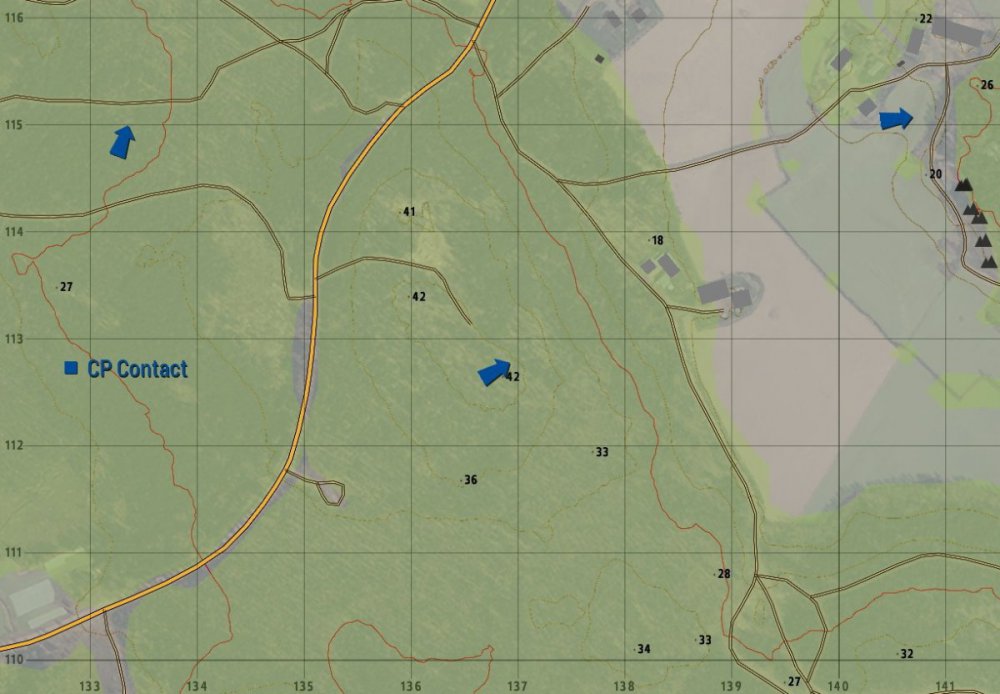
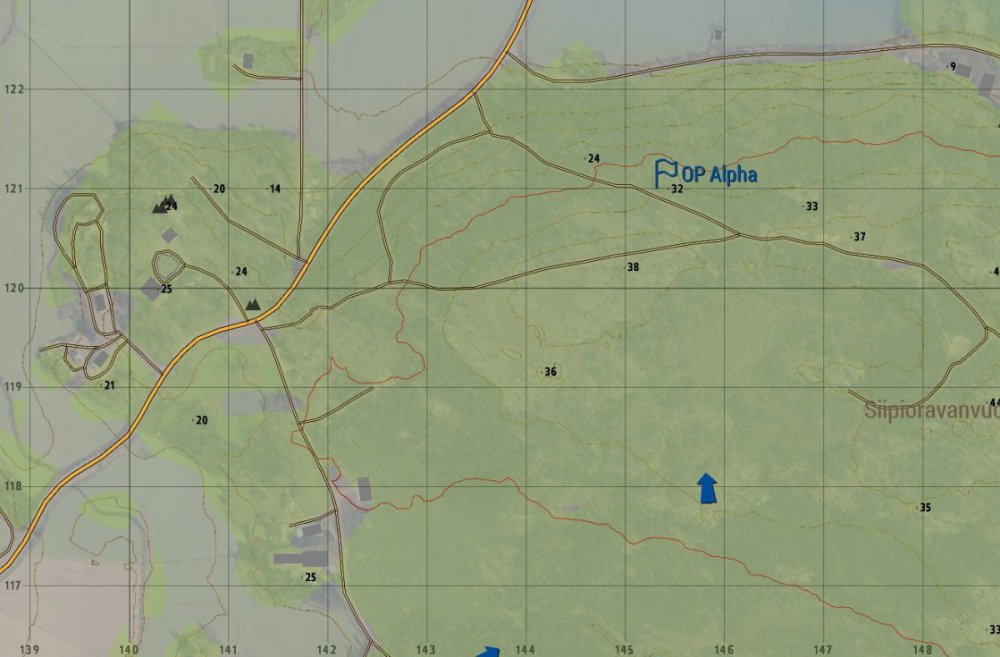
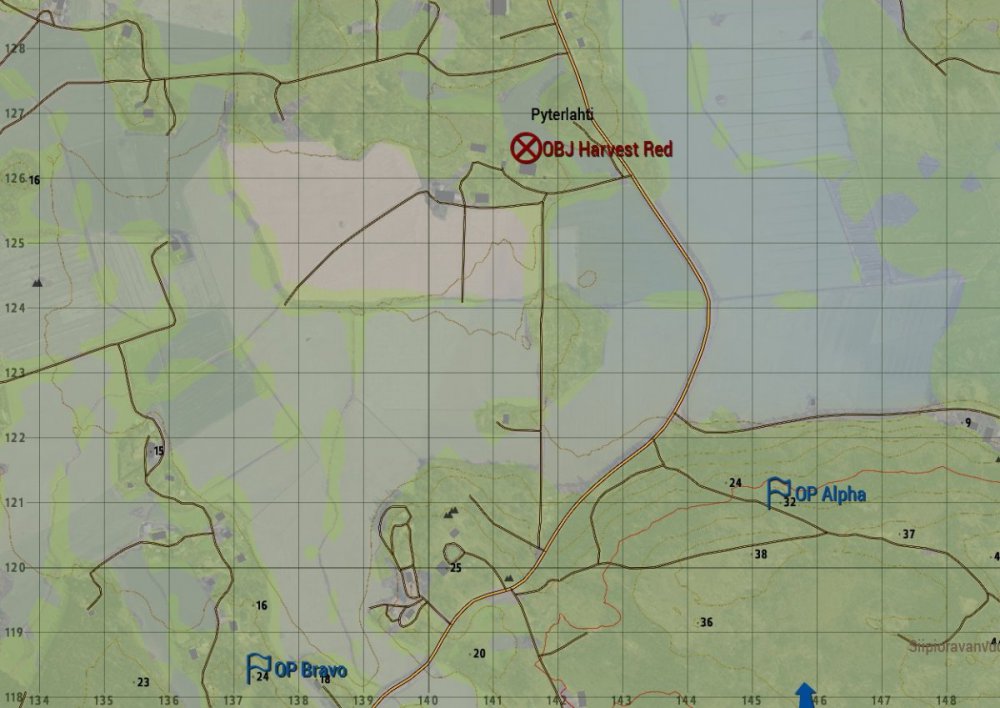
Phase 1B: Phase 1B will the 1-3 and ODA team 2s movement to CP Contact, and then OPs Alpha and Bravo. At CP Contact, ODA team 2 will split off and move to OP Alpha to call in fire support on enemy forces that are gathering there. 1-3 will move to OP Bravo to be in position to draw any enemy forces that engage ODA team 2 if they are found, or move to ODA team 2 if they require assistance. Once this garrison is destroyed, or reduced to a level where they no longer pose a threat, 1-3 and ODA team 2 will move South.

Phase 2A:
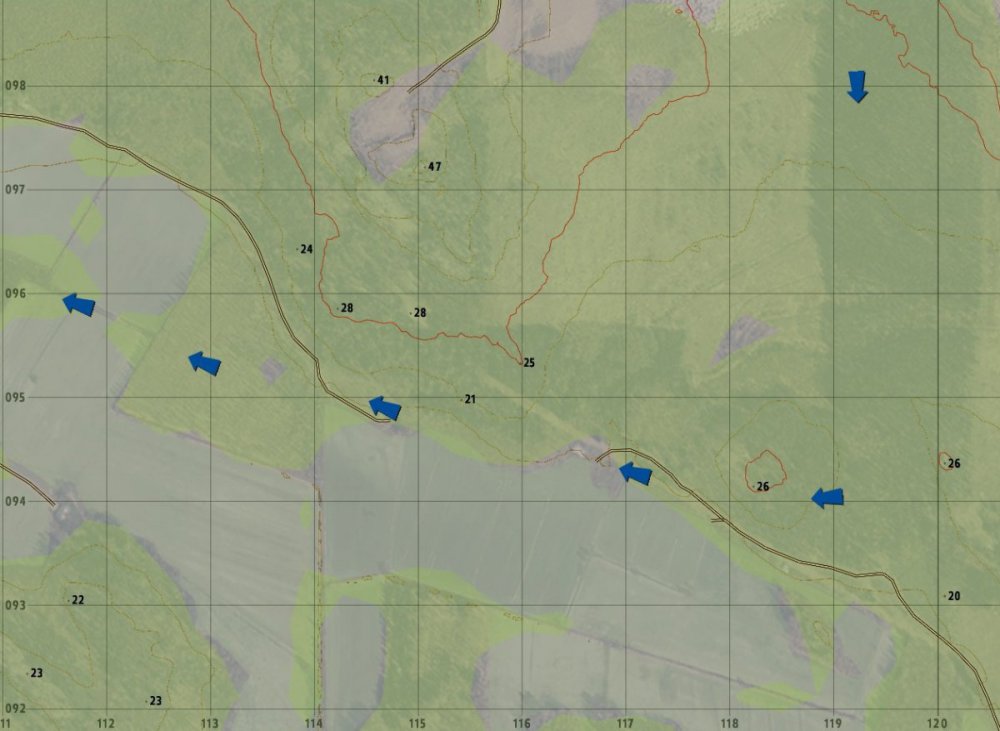
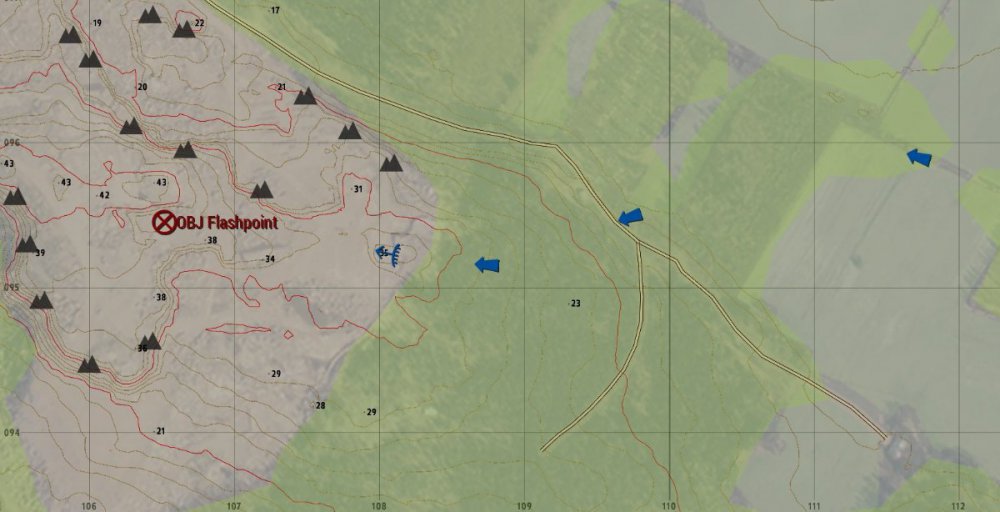
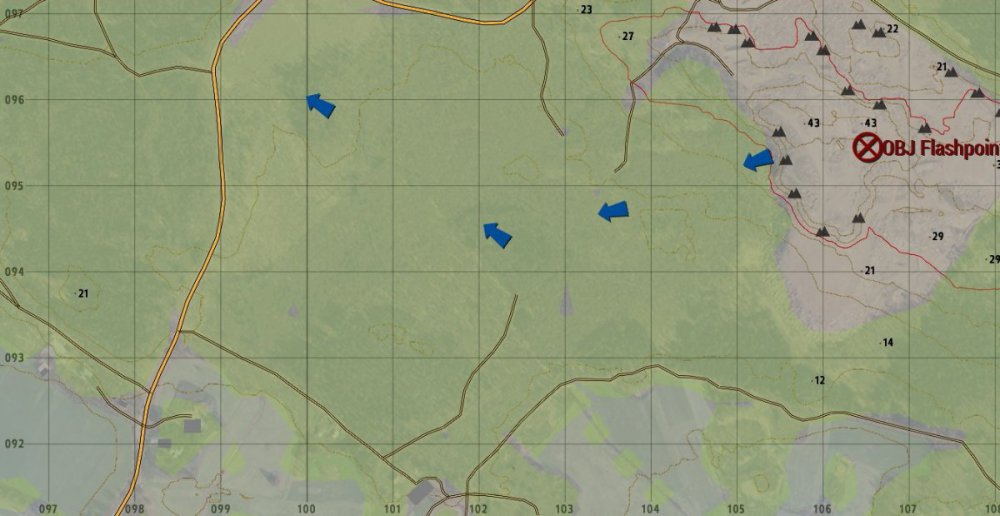
After OBJ Arrowhead is destroyed, 1-1, 1-2, and ODA team 1 will move South, then West, to begin movement towards OBJ Flashpoint at 106-095. 1-2 will establish a firing position at 1081-0953. 1-1 and ODA team 1 will move to 1065-0957 and begin engaging any targets that present themselves. At this time 1-2 will move up to 1-1s position and either move past into the objective area, or attempt to destroy the site from there, depending on where exactly the SAM is. After this objective is destroyed the squads are to exit the objective to the West.

Phase 2B:
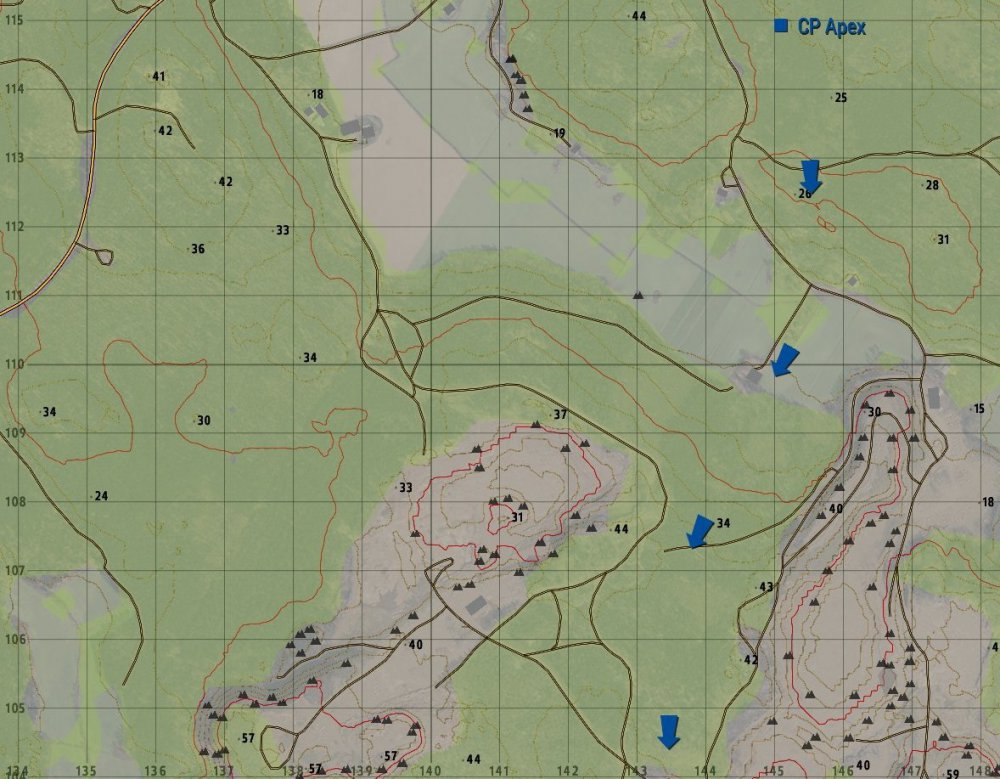
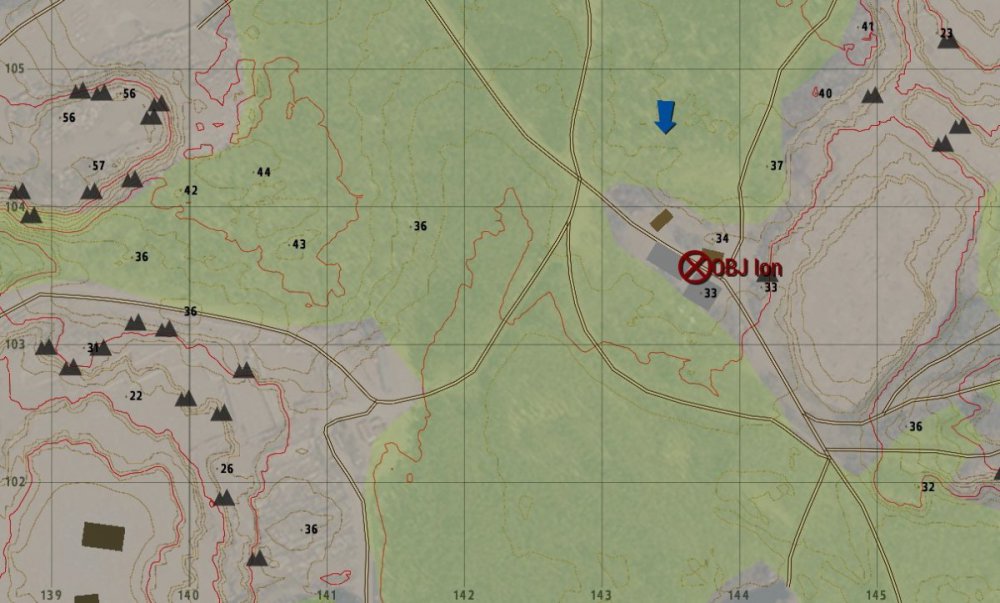
After destroying the enemys at Objective Harvest Red, 1-3 and ODA team 2 will move South to regroup at CP Apex. From there they will move South to OBJ Ion. There they will quickly engage any enemy forces that are there, and take any vehicle that is at the objective back to COP Reforger.
Phase 3A:
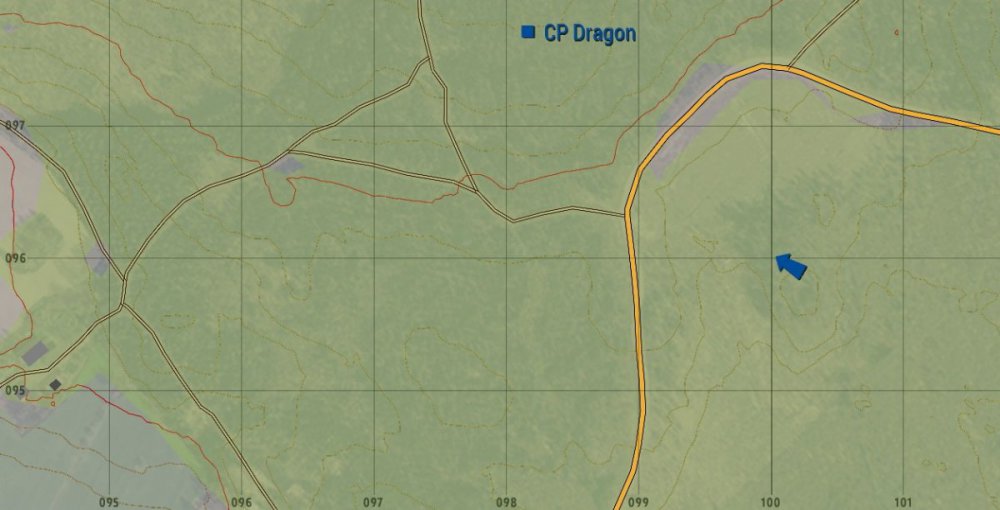
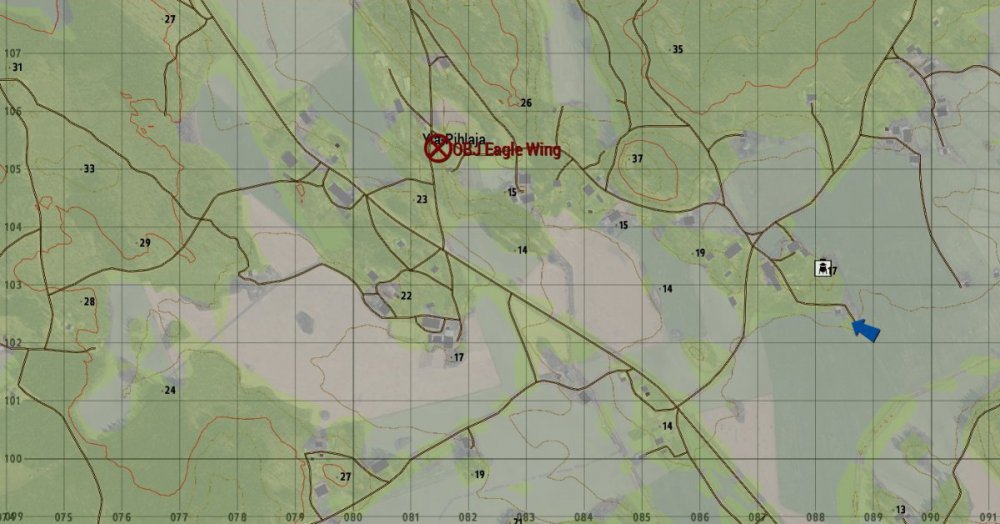
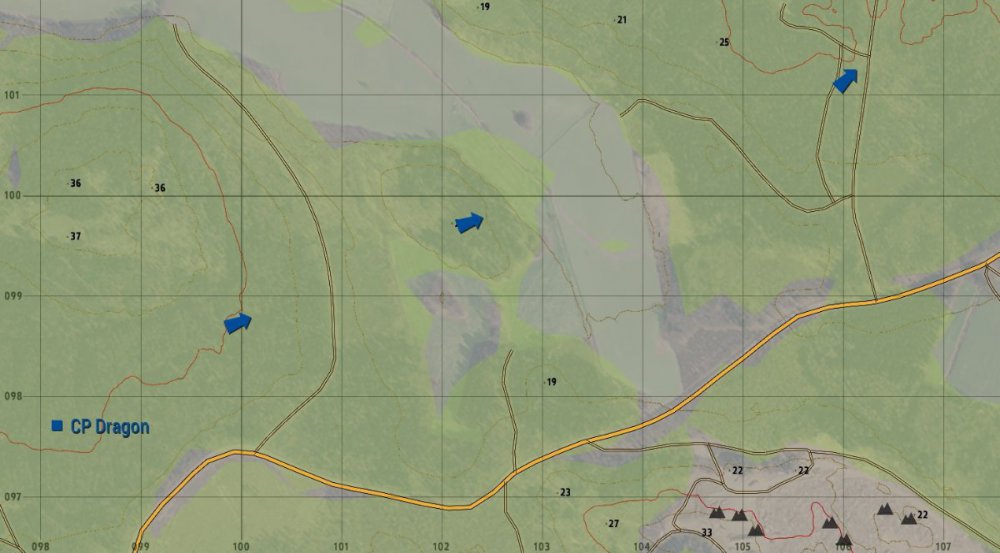
After destroying the SAM site at OBJ Flashpoint, 1-1, 1-2, and ODA team 1 will move Northwest to CP Dragon. There 1-2 will split off and return to COP Reforger to grab the repair vehicle, and bring it to OBJ Eagle Wing to repair the downed heli (See Phase 3B). 1-1 and ODA team 1 will continue North to establish where the helicopter is, as well as make a quick assault plan for it. Once the helicopter is secure ACE will fly ODA and 1-1 out of the objective, while 1-2 and anyone who didnt fit in the helicopter drive back to COP Reforger.

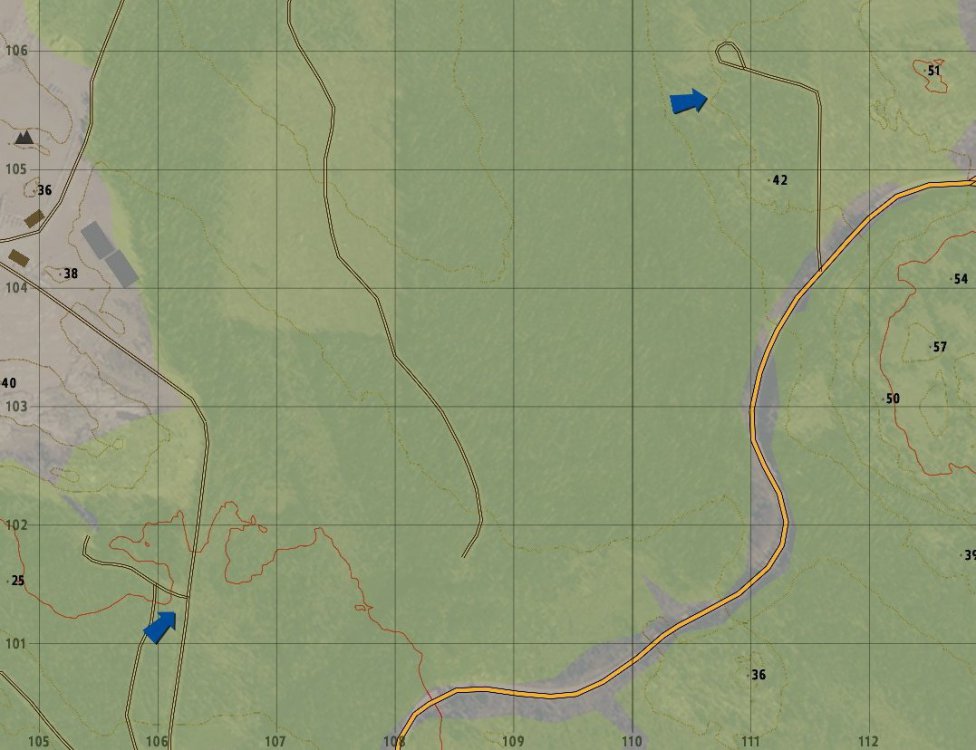
Phase 3B:This is 1-2s recommended path of travel back to COP Reforger to avoid any possible enemy patrols.
Task To Supporting Units:
ACE:
Boost platoon numbers
Repair helicopter
ODA:
Provide spotting for artillery
1-4:
Provide on call fire support with mortars
Defend COP ReforgerCOORDINATING INSTRUCTIONS
Uniform and Equipment:
Refer to Infantry SOP located here: http://72ndairborne.com/ipbdev/index.php?/perscom/document/23-sop-2-1-infantry/
Commander's Priority Intel Requirements:
Notify Platoon Leadership immediately if any intel is obtained.
Any squad must be ready to be recalled to defend the COPRisk Guidance:
We have little support except 1-4
ROE is weapons cold until ordered.Specific Priorities In Order Of Completion:
Destroy SAM Sites
Destroy garrison at OBJ Harvest Red
Recover VehiclesSUSTAINMENT
Transportation:
Heel-toe expressMedical Evacuation:
MEDEVAC not will be available, utilize ACE members on groundPrisoners of War:
Any prisioners of war are to be extracted at the earliest possible time.COMMAND AND SIGNAL
Frequencies (Listed in order, switch one hour into OP):
Alpha Company Command net: TBD
1st Platoon Command net: SW FREQ 116, 118
Avenger 1-1 net: SW FREQ 110, 121
Avenger 1-2 net: SW FREQ 120, 160
Avenger 1-3 net: SW FREQ 130, 200
Avenger 1-4 net: SW FREQ 140, 82
Air-to-Ground net: TBD
Convoy Net: TBD
SF-ODA 072 net: SW FREQ 145, 167Callsigns:
CPT N. Icomach 'Avenger-6'
1LT Z. Katz 'Hitman-Actual'
1LT A. Fortnum 'Avenger 1-6'
SSG J. McCandless 'Avenger 1-1'
SSG A. Razgriz 'Avenger 1-2'
MSG R. Garich 'Avenger 1-3'
SSG C. Davison 'Avenger 1-4'
1LT A. Guard 'ACE-6'
MSG K. Hargy 'ACE-7'Chain of Command:
1LT A. Fortnum,
MSG R. Garich,
SSG A. Razgriz,
SSG J. McCandless
SSG C. Davison -
ATTENDANCE:
AAR: Out of all the Ops, that was one of them.
FINAL NOTES: Happy Birthday Raz
// S1 DATA //
AIRBORNE JUMP CONDUCTED: N
PROMOTIONS: None
AWARDS: N/A
RECRUIT TRANSFERS:
LOA/TPR SCREENSHOT:
-
UPDATED TIMELINE (All times are in game time)
0213: Mission Start
0220: Remaining forces at ORP depart for RP, Platoon hold point.
0225: ODA, 1-4 begin barrage
0230: Barrage end, platoon begin movement from platoon hold point -
ATTENDANCE:
AAR: We're fuckin lost man.
FINAL NOTES:
// S1 DATA //
AIRBORNE JUMP CONDUCTED: Y?
PROMOTIONS: Greer to SSG
AWARDS: N/A
RECRUIT TRANSFERS:
LOA/TPR SCREENSHOT:
-
ATTENDANCE:
AAR:
FINAL NOTES: Communication was bad. NCOs need to step up when their leader is down.
// S1 DATA //
AIRBORNE JUMP CONDUCTED: N
PROMOTIONS: N/A
AWARDS: N/A
RECRUIT TRANSFERS: None
LOA/TPR SCREENSHOT:

-
Instructor: A. Fortnum
Student: J. BourassaAttendance:
-
Instructor: A. Fortnum
Student: G. SamsonAttendance:
Ceja
Time for Course: 2 hours
-
Instructor: A. Fortnum
Student: J. tylerAttendance:

Time for Course: 2 hours
-
Instructor: A. Fortnum
Student: S. WilliamsAttendance:
& HydraTime for Course: 2 hours
-
Is it legal for you to process your own school?
-
Instructor: A. Fortnum
Student: M. PikeAttendance:
Time for Course: 2 hours
-
ATTENDANCE:
AAR:
FINAL NOTES: hehe. Mines go BOOM
// S1 DATA //
AIRBORNE JUMP CONDUCTED: N
PROMOTIONS: None
AWARDS: None
RECRUIT TRANSFERS:
LOA/TPR SCREENSHOT:
-
Instructor: A. Fortnum
Student: D. EscalanteAttendance: Z. Katz
W. Riker
A. Adams
J. Mccandless
Guest Staring: G. WhitakerTime for Course: 2 hours
-
Instructor: A. Fortnum
Student: J. GutierrezAttendance:
Time for Course: 2 hours
Result: Passed -
ATTENDANCE:
AAR: 1-1, Local elder supplied two towns that need to be liberated; Shaloren, and Shahraze. Found cave with supplies and barracks.
1-2: Delivered food at obj 3, they started shooting, killed them all, took food back and took leader.
1-3: Demined road at 14-02. Cleared oilfields. Cleared cave. Captured guy who glitched out. (Nico says hes important)
HQ: conducted a meeting with Italian leadership, and local leaders. Got some names.
FINAL NOTES:
// S1 DATA //
AIRBORNE JUMP CONDUCTED: N
PROMOTIONS: None
AWARDS: Bwa: Air Service Medal
RECRUIT TRANSFERS:
LOA/TPR SCREENSHOT:
-
ATTENDANCE:
SSG Z. Adams
SPC C. Chadder
1LT A. Guard
SPC A. Keeneye
SPC D. Escalante
MSG M. Johnson
SPC S. Williams
1LT Z. Katz
CW5 D. Bwa
SSG J. McCandless
CPL J. Davis
CPT N. Icomach
SPC G. Samson
SPC O. Jones
PFC W. Riker
SFC D. Yocum
SPC J. Bourassa
SGT G. Kelley
SSG C. Davison
SPC N. Fleming
SPC T. Mann
CW5 H. Sölvason
SGT V. Peacekeeper
PVT P. Dawson
SFC G. Garrett
SPC M. Panda
REC I. Centeno
CW5 T. Prodigy
CW5 A. Hydra
SPC J. Tyler
SPC D. Roni
SGT R. Flenke
SPC C. Row
SGT H. Greer
PVT A. Loki
SPC M. Preik
REC B. Yao
SSG J. Urbanowski
PVT R. Crowe
CPL M. Xander
SFC K. Hargy
SPC K. King
SGT G. Coil
SPC J. Stevenson
SPC J. Max
PVT C. Ceja
PVT C. Hill
CW4 S. Booce
PFC J. Gutierrez
SPC K. Martin
2LT R. Vann
PVT B. Phoenix
SPC M. Pike
SSG A. Razgriz
1LT A. FortnumAAR: Got redirected to Altis to deal with a CSAT invasion there, successfully repelled.
FINAL NOTES: Comms need work as always
// S1 DATA //
AIRBORNE JUMP CONDUCTED: N
PROMOTIONS: Pheonix to PFC
AWARDS: N/A
RECRUIT TRANSFERS:
LOA/TPR SCREENSHOT:

-
ATTENDANCE:

AAR: Box is fucked
FINAL NOTES: Counts as a mission
// S1 DATA //
AIRBORNE JUMP CONDUCTED: N
PROMOTIONS: R. Vann to 2LT, J. McCandless to SSG, N. Claudino to PFC, W. Riker to PFC, T. Prodigy to CW5, B. Fines to SGT
AWARDS: N/A
RECRUIT TRANSFERS:
LOA/TPR SCREENSHOT:
-
TIME: 29JAN2022 @ 0600
WEATHER: Clear
TERRAIN: Urban
SITUATION:
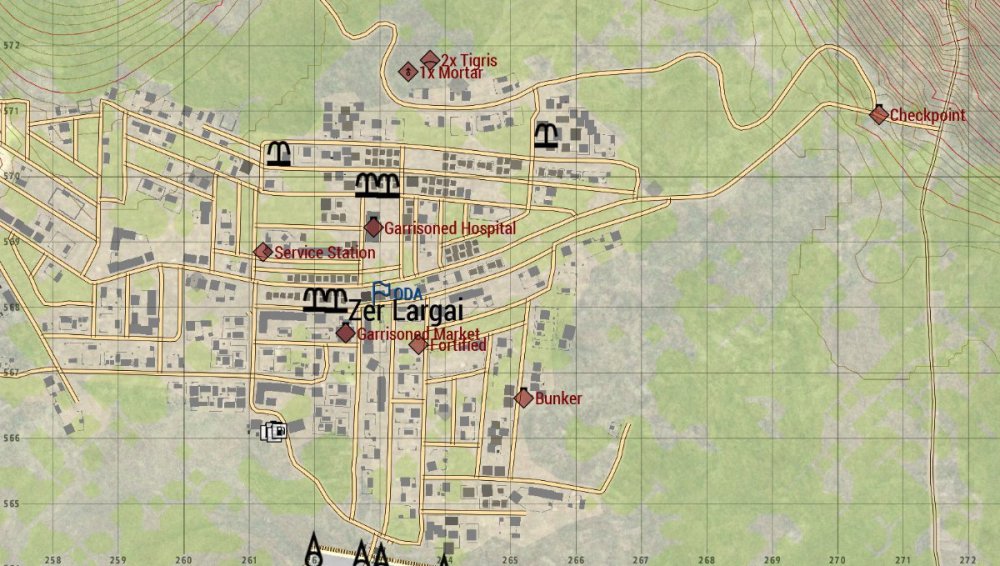
The 72nd airborne is being deployed to Pakistan to push CSAT out. Avenger company is to seize the town of Zer Largai from CSAT-Friendly Forces:
72nd ODAHigher Command’s Mission:
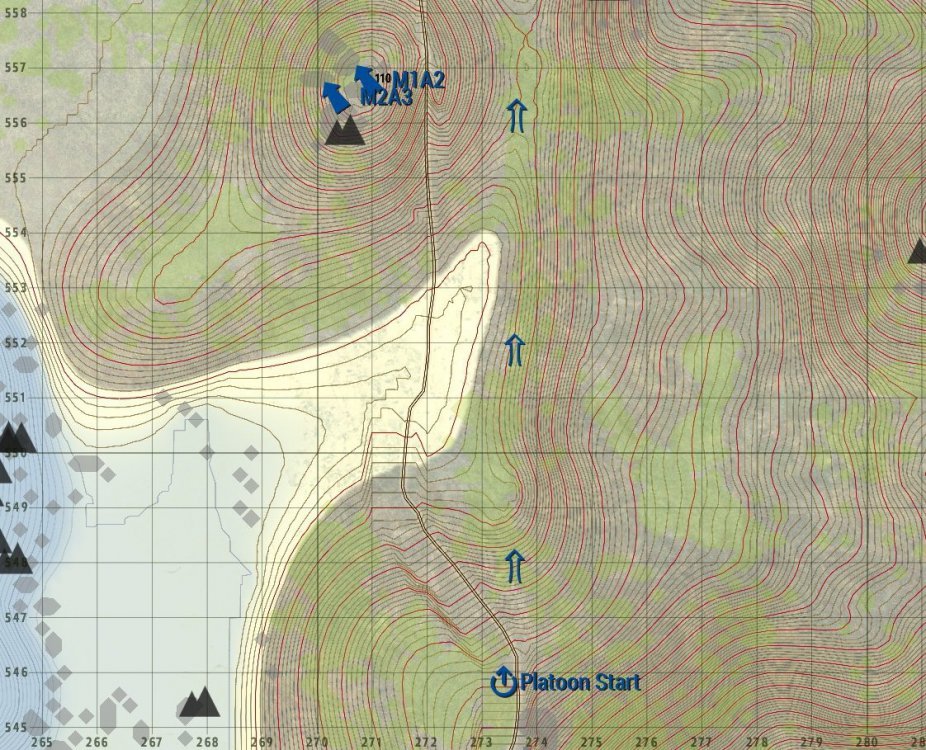
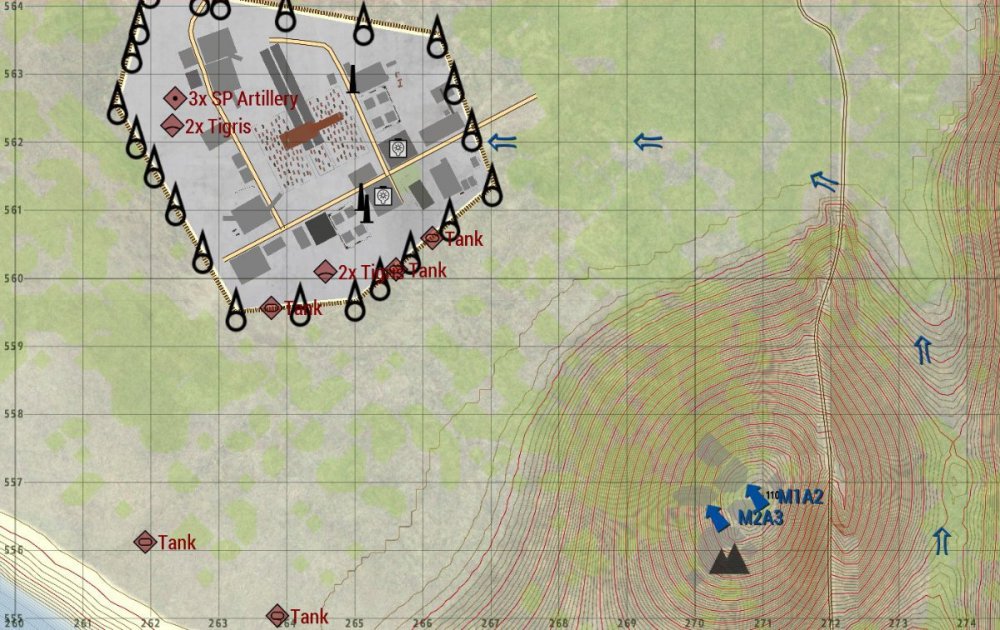
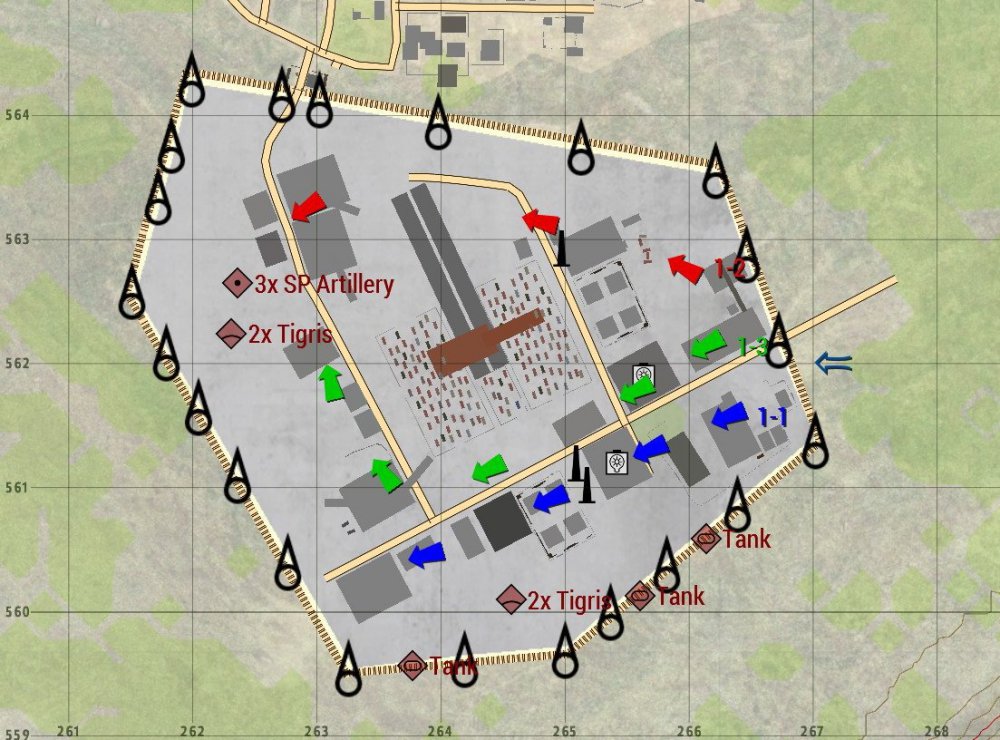
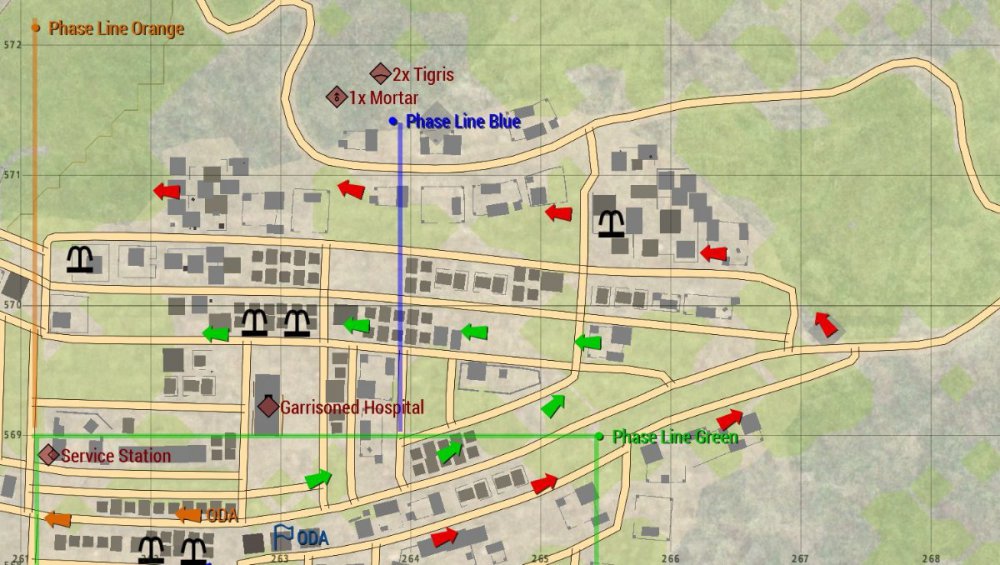
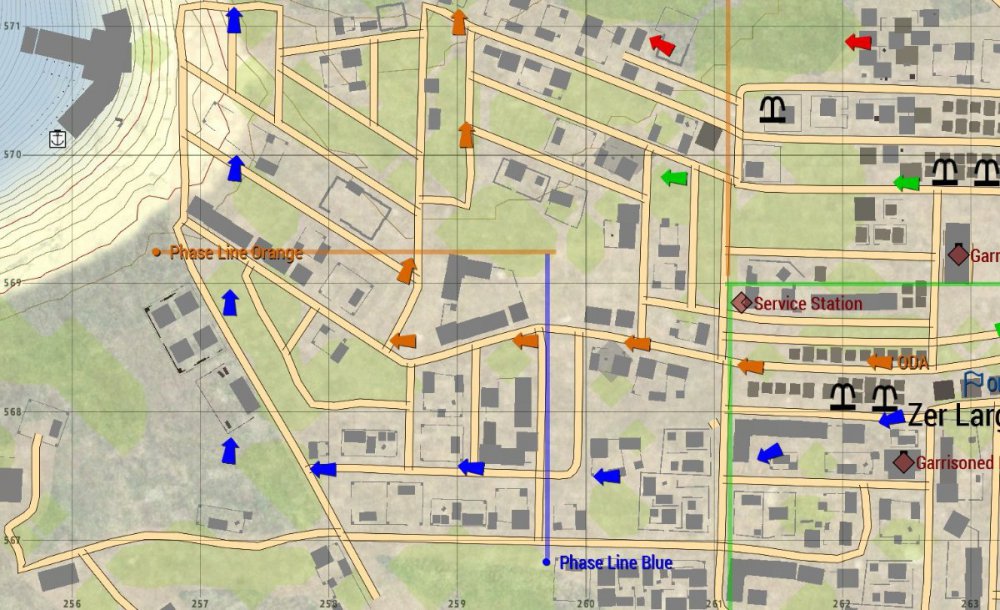
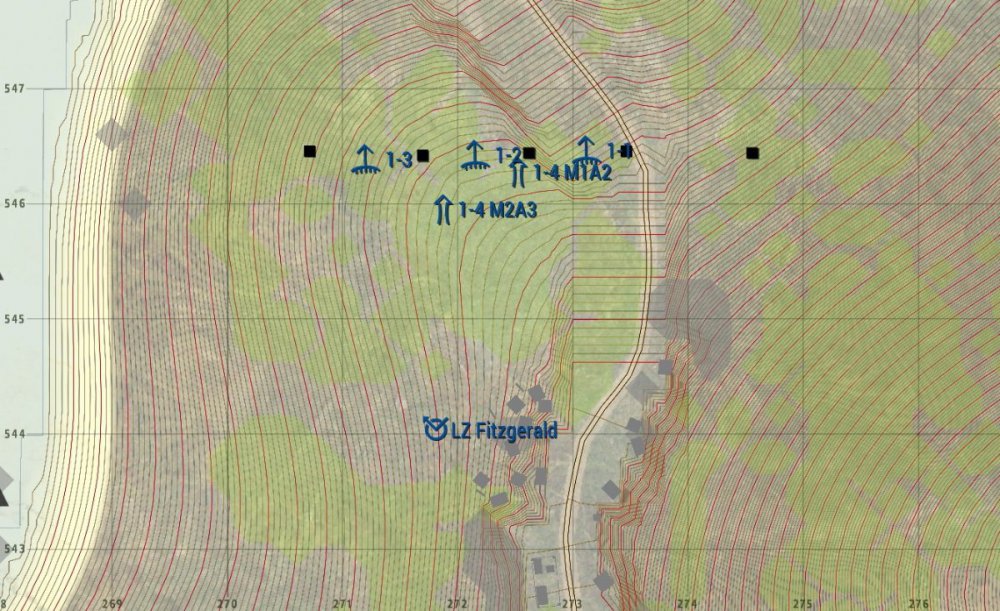
Avenger company is to start at their defensive line at 273-545, and move North. 1-4 will position their armour on the hilltop at 270-556, while the platoon moves around the East side of the hill. the 72nd will then assault the industrial area South of the city, before moving into the city itself. Refer to the following two images for intel on hostile positions. Note that these are not to be taken as complete, and there will be other positions that are not marked.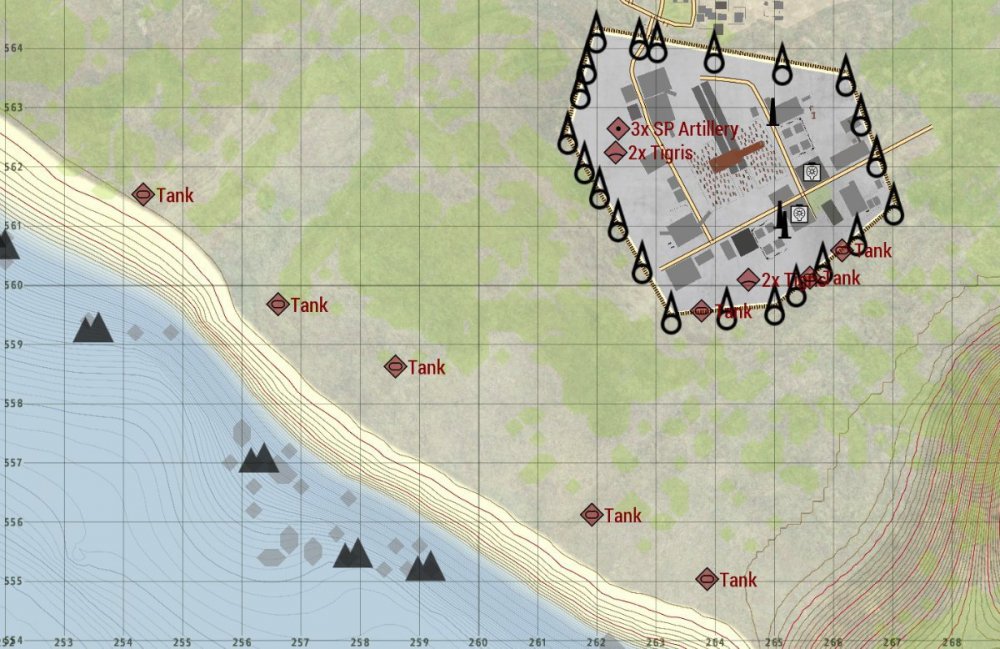
MISSION
Execution: This Mission will be carried out in 3 Phases
Phase 1:
Avenger company is currently in a defensive formation at 273-545. From there they will move Northwest to move North through the valley between hills 110 and 178. While this is happening 1-4 will move to the top of hill 110 with their M2A3 and M1A2, but stay hidden from hostiles in the city. ACE should be striking targets along the Southwestern side of the city, as well as in the city itself. When the rest of the platoon is direct East of the industrial area, they will turn West and approach, aiming for the hole in the wall that ACE hopefully puts there before we get there. From there the platoon will spread out and clear the entire area. 1-1 will clear the buildings on the South, 1-2 the North, and 1-3 the central area. Once the entire industrial area is clear the platoon will regroup on the North gate.
Phase 2:
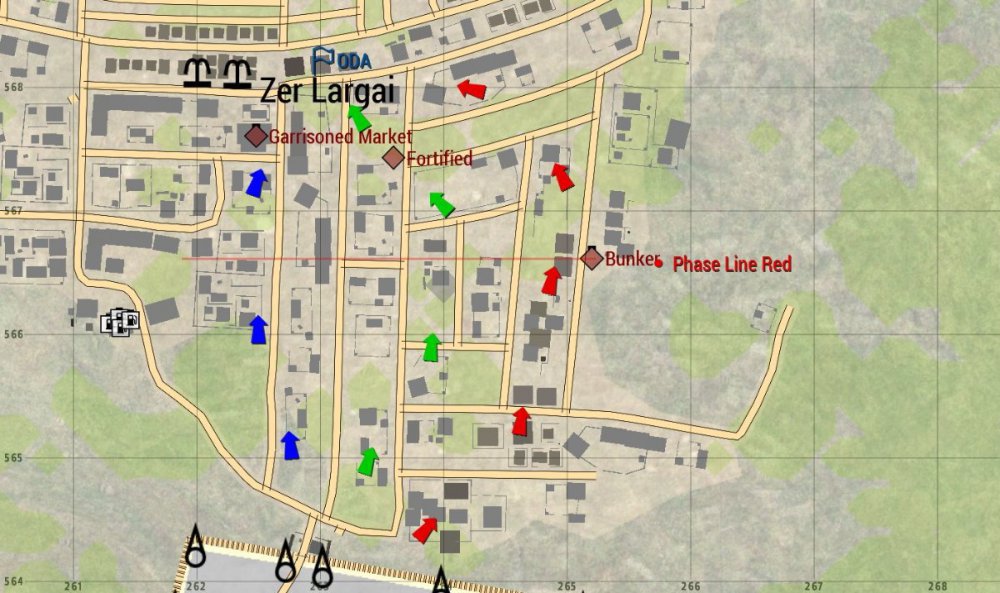
Avenger company will then move North to clear the Southeastern area of the city, to work their way towards ODAs position in the centre of the city. There's one phase line in this section, called Phase Line Red. No squad should pass this phase line until all squads have reached it. 1-1 will clear the West side of this section, which has a market that has been garrisoned. 1-2 will clear the Eastern end, including the bunker, which marks Phase Line Red. 1-3 will again clear the centre area, which has some sort of fortification that hasn't been identified further. All squads will converge on ODAs position, which are the two tall apartment buildings in the centre of the city. 1-4 during this phase will be moving around the outskirts of the city supporting the platoons movement. They should try not to enter the city unless they can be supported by a squad.
Phase 3:
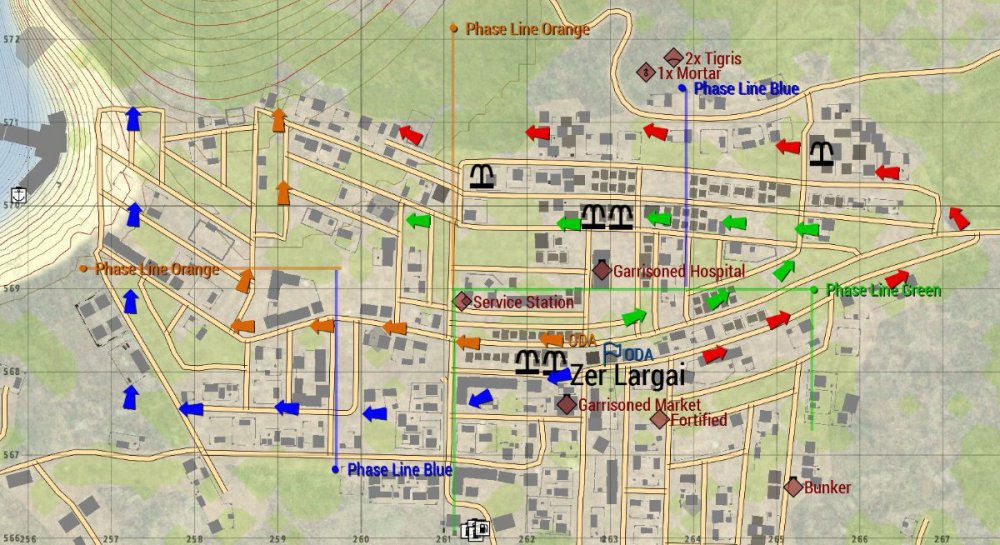
Once the platoon has reached ODA, the platoon will be divided into 2 elements. With 1-1 and ODA moving West, and 1-2 and 1-3 moving Northeast. The M1A2 should move Northeast to support 1-2 and 1-3, with the M2A3 moving West. There is 3 phase lines in this section, Green, Blue, and Orange. These phase lines shall not be passed until both squads in that element have reached the phase line. The exception for this will be Phase Line Orange. All squads need to be at Phase Line Orange before anyone moves past to limit the chance of friendly fire. One element will be the assault element for this phase line while the rest support, and then move through once the other element has reached the outskirts.
Task To Supporting Units:
ACE:
Provide transport for platoon reinforcements
Provide on-call CAS
Provide resupply if needed
Airdrop replacement vehicles if needed.COORDINATING INSTRUCTIONS
Uniform and Equipment:
Refer to Infantry SOP located here: http://72ndairborne.com/ipbdev/index.php?/perscom/document/23-sop-2-1-infantry/Commander's Priority Intel Requirements:
Notify Platoon Leadership immediately if any intel is obtained.Risk Guidance:
ROE is weapons hot on hostile forces.Specific Priorities In Order Of Completion:
Insert
Clear Industrial Area
Reach ODA
Clear CitySUSTAINMENT
Transportation:
Supplied vehicles, Heel-toe express.Medical Evacuation:
MEDEVAC will be availablePrisoners of War:
Any prisioners of war are to be extracted at the earliest possible time.COMMAND AND SIGNAL
Frequencies:
Alpha Company Command net: LR FREQ 32
1st Platoon Command net: SW FREQ 106
Avenger 1-1 net: SW FREQ 101
Avenger 1-2 net: SW FREQ 102
Avenger 1-3 net: SW FREQ 103
Avenger 1-4 net: SW FREQ 104
Air-to-Ground net: LR FREQ 40
Convoy Net: LR FREQ 30
SF-ODA 072 net: SW FREQ 107Callsigns:
CPT N. Icomach 'Avenger-6'
1LT Z. Katz 'Hitman-Actual'
1LT A. Fortnum 'Avenger 1-6'
SSG A. Razgriz 'Avenger 1-1'
SGT R. Vann 'Avenger 1-2'
MSG R. Garich 'Avenger 1-3'
SSG C. Davison 'Avenger 1-4'
1LT A. Guard 'ACE-6'
SFC K. Hargy 'ACE-7'Chain of Command:
1LT A. Fortnum,
MSG R. Garich,
SSG A. Razgriz,
SSG R. Vann
SSG C. Davison -
ATTENDANCE:
AAR:
FINAL NOTES:
// S1 DATA //
AIRBORNE JUMP CONDUCTED: N
PROMOTIONS: G. Coil to SGT, D. Roni to SPC
AWARDS: N/A
RECRUIT TRANSFERS:
LOA/TPR SCREENSHOT:
-
TIME: 22JAN2022 @ 0300
WEATHER: Clear
TERRAIN: Mountain, Urban
SITUATION:
The 72nd airborne is being deployed to Pakistan to push CSAT out. Avenger company is to conduct a convoy clearing operation to the town of Darband, to secure a forward line for further operations-Friendly Forces:
72nd ODAHigher Command’s Mission:
Avenger company is to be deployed to grid 332-438. From there they will load into vehicles and depart along the road to the West and North. 3 areas with potential enemy activity will be cleared enroute to the town of Darband. Darband will then be secured for the 72nd to use as a staging area for the assault on the town of Zer Largai. DZ/LZs have been predesignated for this mission, but additional ones can be created if the need arises.MISSION
Execution: This Mission will be carried out in 3 Phases
Phase 1:
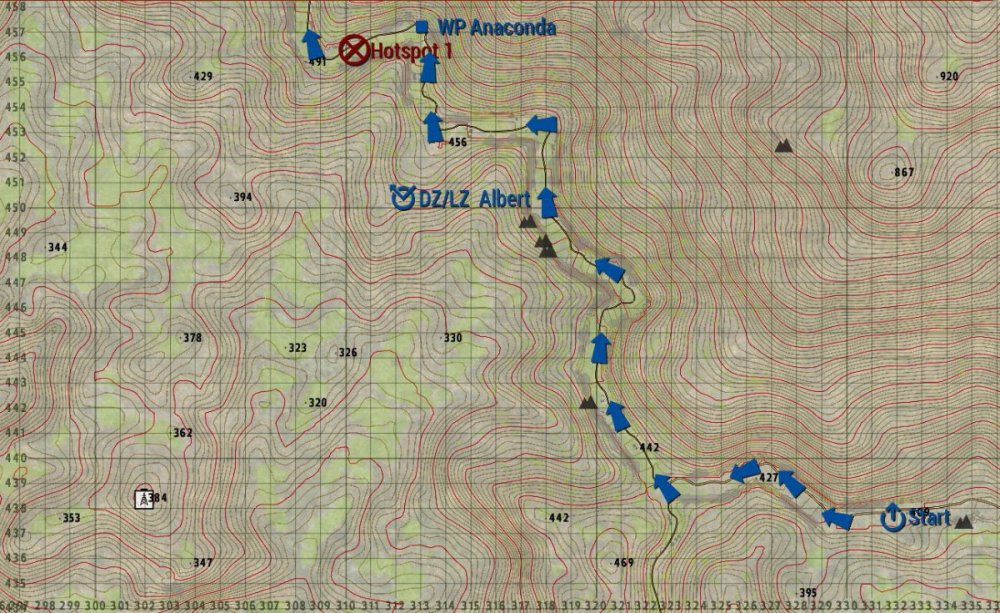
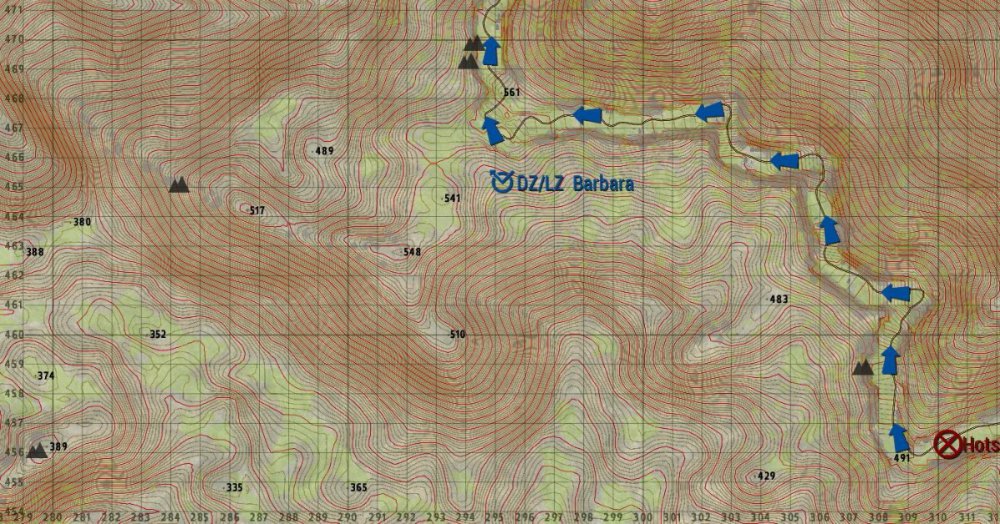
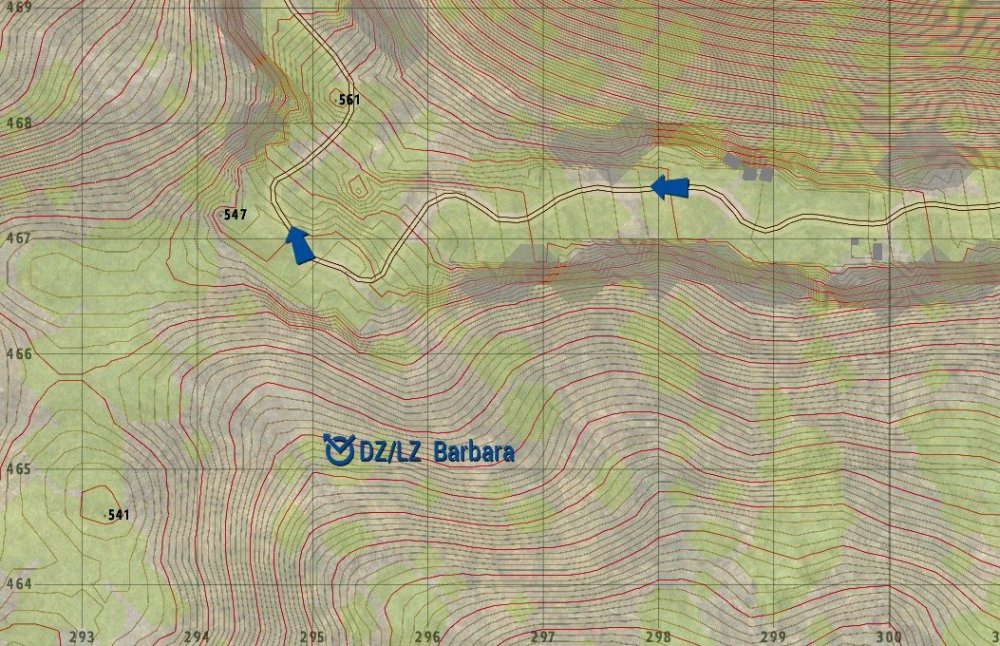
Avenger company has been transported to 332-438 by logistics forces through the night, as well as a selection of Tanks, IVFs, and HMMVWs. Each squad will have 3x M1151A1 (O-GPK/M2), except 1-4, who will have 1x M1A2SEPV2 and 1x M2A3 (BUSK III). Platoon will move out along the route with 1-1 in the lead, followed by 1-2. 1-4s Bradley will be behind 1-2, with 1-3 behind them. 1-4s M1A2 will be in the rear. Platoon will move to WP Anaconda, where 1-1, 1-2, and 1-3 will soft dismount. The platoon will then move into the objective and clear out all enemy forces. If any replacement vehicles are needed DZ/LZ Albert has been established at 312-450. Afterwords they will all mount back up and begin movement to WP Boa, where again, 1-1, 1-2, and 1-3 will soft dismount and clear the objective compound. The DZ/LZ for this area is DZ/LZ Barbara, located at 259-465

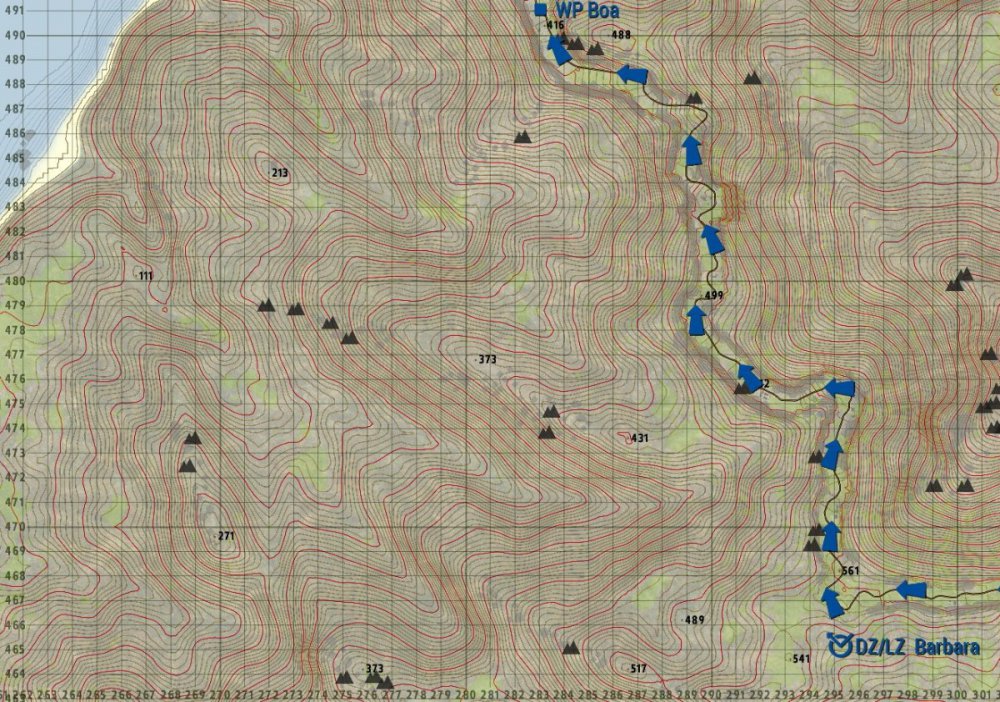

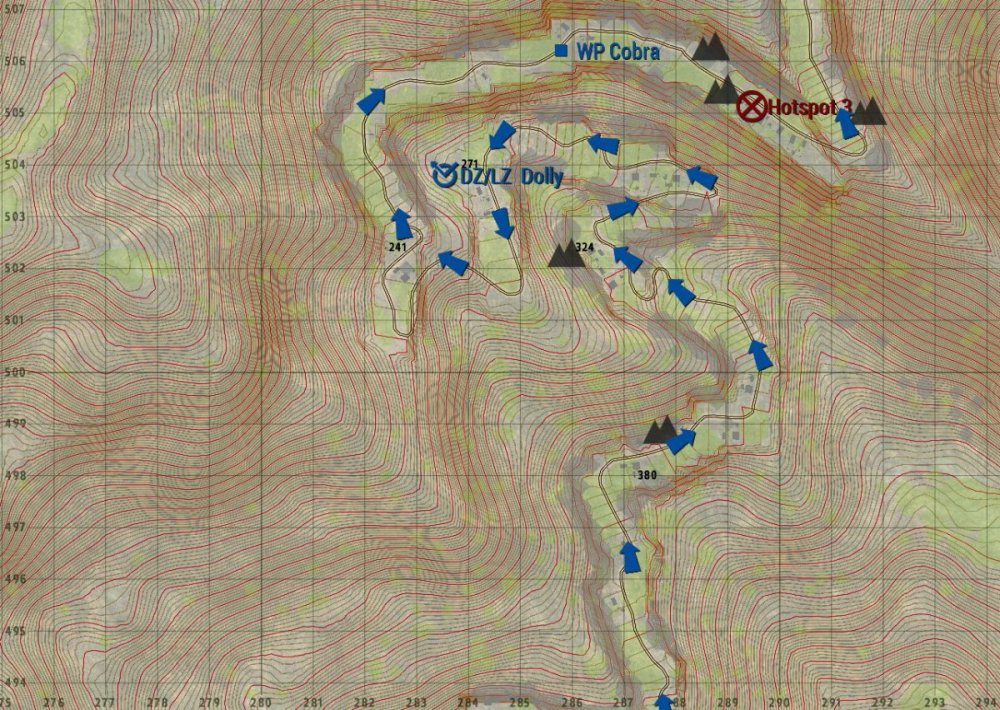
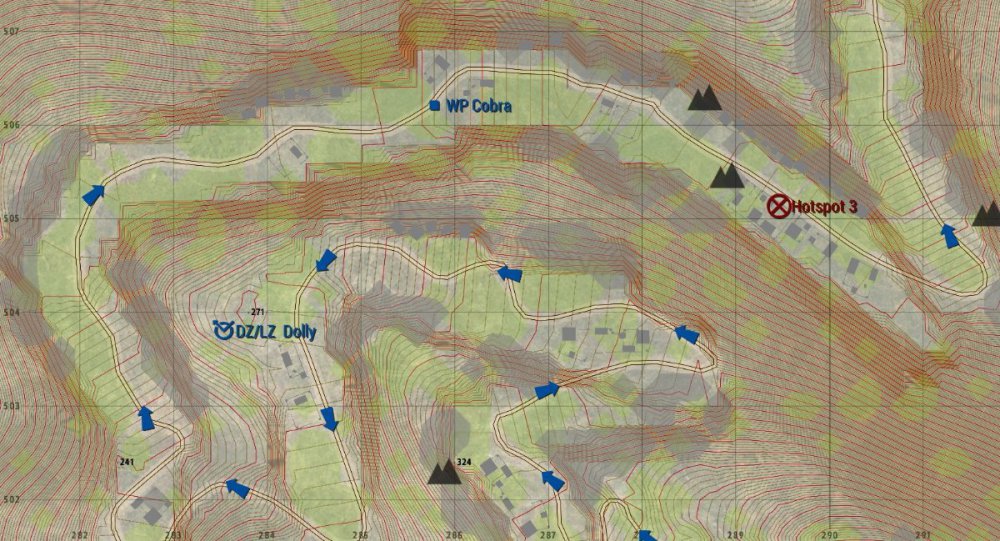
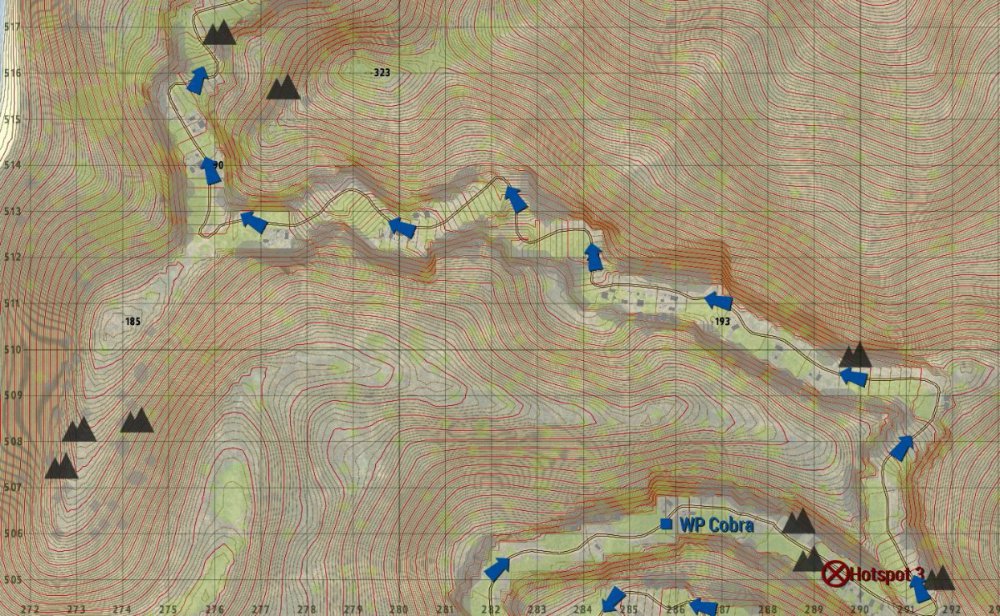
Phase 2:
Avenger company will then move to WP Cobra, where they will again soft dismount and clear another enemy hotspot. This AOs DZ/LZ is Charles at 281-493. After this they will move to WP Mamba. At WP Mamba, 1-1, 1-2, and 1-3 will dismount their vehicles and proceed to clear North through the town of Darband. Squads will clear one compound at a time while bounding past compounds currently being cleared by other squads. 1-4 will be holding the rear and ensuring no hostiles come from up the mountain, or from the rear. Every so often a squad will be called to the rear to pickup the platoons vehicles and move them closer to the platoons current location. the DZ/LZ for the town of Darband is DZ/LZ Edward, at 271-536.
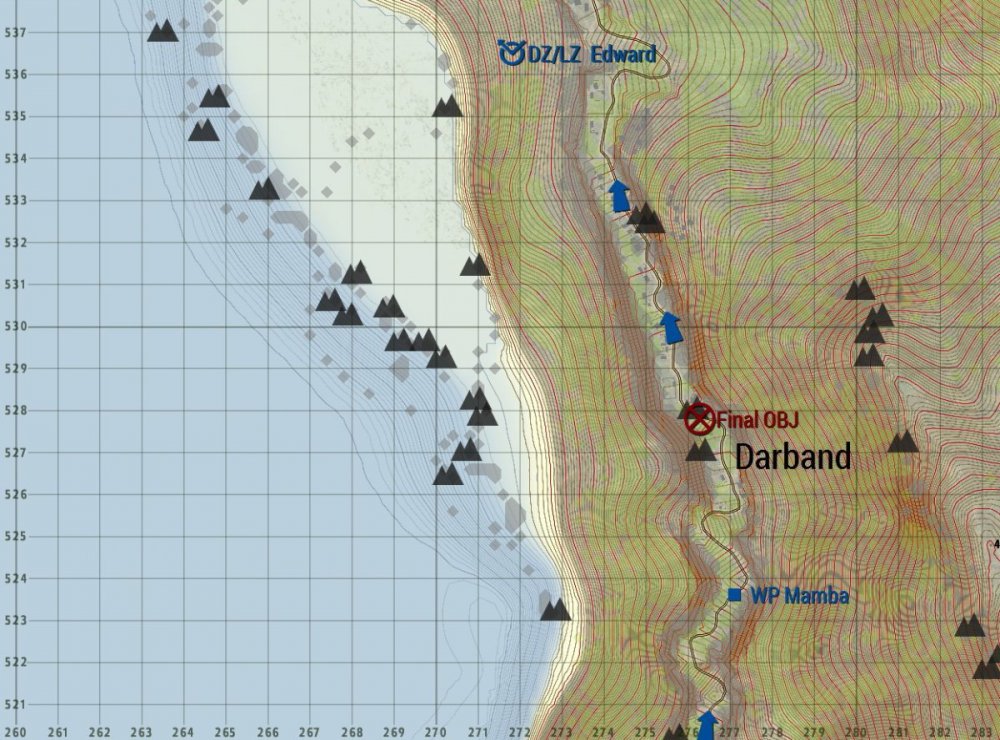
Phase 3:
Once the entire town is clear the platoon will establish a defensive line North of Darband to prevent any enemy forces from moving South out of Zer Largai. One team from each squad will focus on building trenches for their squad, while the other team provides overwatch. 1-4 will dig in their vehicles at marked locations, or in a spot of their choosing, where they can watch North and fire on any hostiles moving South. There will be a type 3 CAS box located in the valley, where ACE will be firing on anything that moves. No squad is to move forward of this line without informing 1-6, and getting confirmation that they type 3 is no longer in effect. And reinforcements for this stage are to be flown to LZ Fitzgerald at 271-544.
Task To Supporting Units:
ACE:
Provide transport for platoon reinforcements
Provide on-call CAS
Provide resupply if needed
Airdrop replacement vehicles if needed.COORDINATING INSTRUCTIONS
Uniform and Equipment:
Refer to Infantry SOP located here: http://72ndairborne.com/ipbdev/index.php?/perscom/document/23-sop-2-1-infantry/Commander's Priority Intel Requirements:
Notify Platoon Leadership immediately if any intel is obtained.Risk Guidance:
ROE is weapons hot on hostile forces.Specific Priorities In Order Of Completion:
Insert
Clear Hotspot 1
Clear Hotspot 2
Clear Hotspot 3
Secure Darband
Establish Defensive LineSUSTAINMENT
Transportation:
Supplied vehicles.Medical Evacuation:
MEDEVAC will be availablePrisoners of War:
Any prisioners of war are to be extracted at the earliest possible time.COMMAND AND SIGNAL
Frequencies:
Alpha Company Command net: LR FREQ 32
1st Platoon Command net: SW FREQ 106
Avenger 1-1 net: SW FREQ 101
Avenger 1-2 net: SW FREQ 102
Avenger 1-3 net: SW FREQ 103
Avenger 1-4 net: SW FREQ 104
Air-to-Ground net: LR FREQ 40
Convoy Net: LR FREQ 30
SF-ODA 072 net: SW FREQ 107Callsigns:
CPT N. Icomach 'Avenger-6'
1LT Z. Katz 'Hitman-Actual'
1LT A. Fortnum 'Avenger 1-6'
SSG A. Razgriz 'Avenger 1-1'
SGT R. Vann 'Avenger 1-2'
MSG R. Garich 'Avenger 1-3'
SSG C. Davison 'Avenger 1-4'
1LT A. Guard 'ACE-6'
SFC K. Hargy 'ACE-7'Chain of Command:
1LT A. Fortnum,
MSG R. Garich,
SSG A. Razgriz,
SSG R. Vann
SSG C. Davison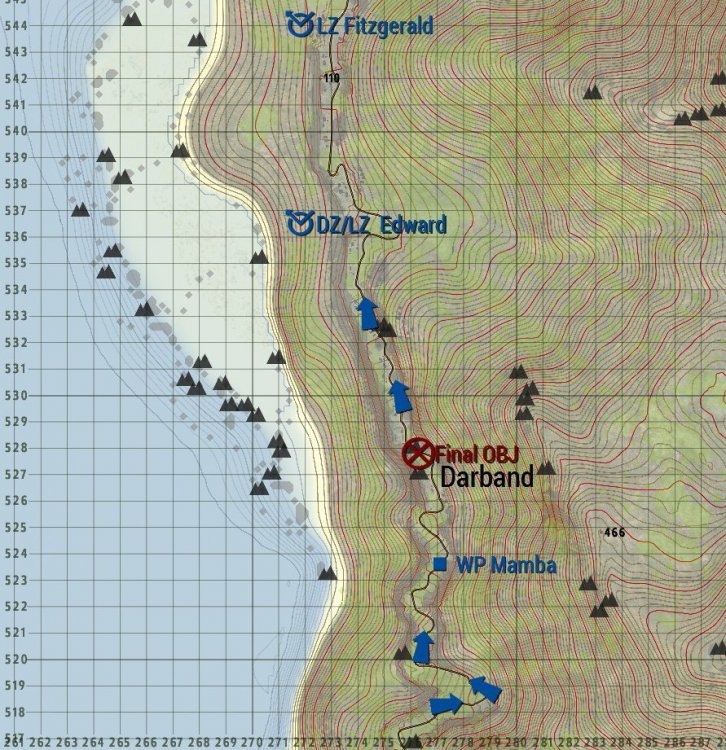
-
ATTENDANCE:
AAR:
FINAL NOTES:
// S1 DATA //
AIRBORNE JUMP CONDUCTED: N
PROMOTIONS: None
AWARDS: N/A
RECRUIT TRANSFERS:
LOA/TPR SCREENSHOT:
-
ATTENDANCE:

AAR: Didn't Finish clearing OBJ Wasabi.
FINAL NOTES: Arty sucks
// S1 DATA //
AIRBORNE JUMP CONDUCTED: N
PROMOTIONS: N. Pie to PFC, Z. Adams to SSG
AWARDS: N/A
RECRUIT TRANSFERS:
LOA/TPR SCREENSHOT:
-
TIME: 08JAN2022 @ 0800
WEATHER: Clear
TERRAIN: Urban, Open
SITUATION:
The 72nd airborne is being deployed to Pakistan to push CSAT out. Avenger company is to secure the town of Sawabi as a foothold to advance further North.-Friendly Forces:
101st Airborne, 72nd ODA, MujahdeenHigher Command’s Mission:
Avenger company is to be deployed to the South of Sawabi, and then move North into the town. They will then assault through the whole town, and repel any counterattack. They will then seize an outpost to the North, followed by a FOB.MISSION
Execution: This Mission will be carried out in 4 Phases
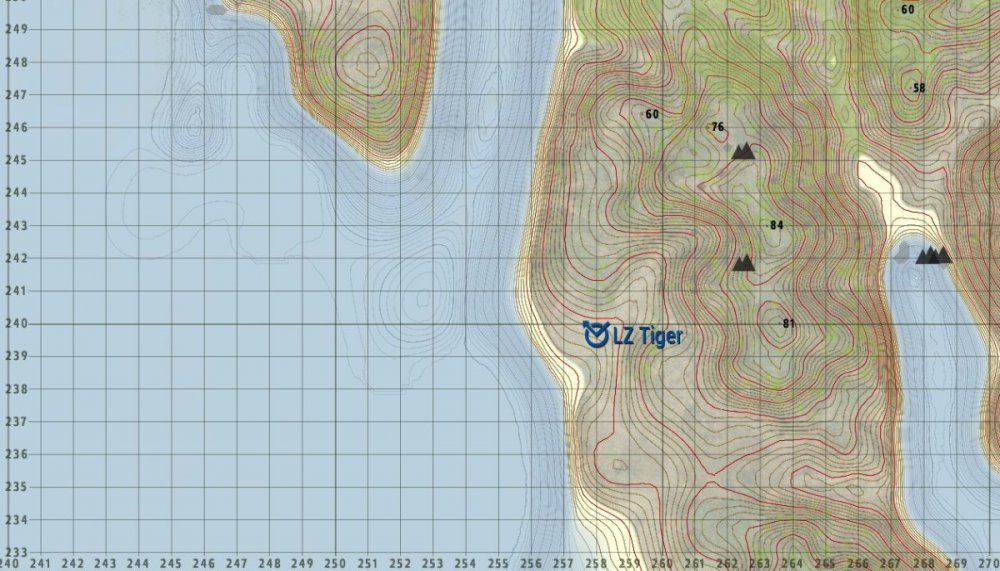
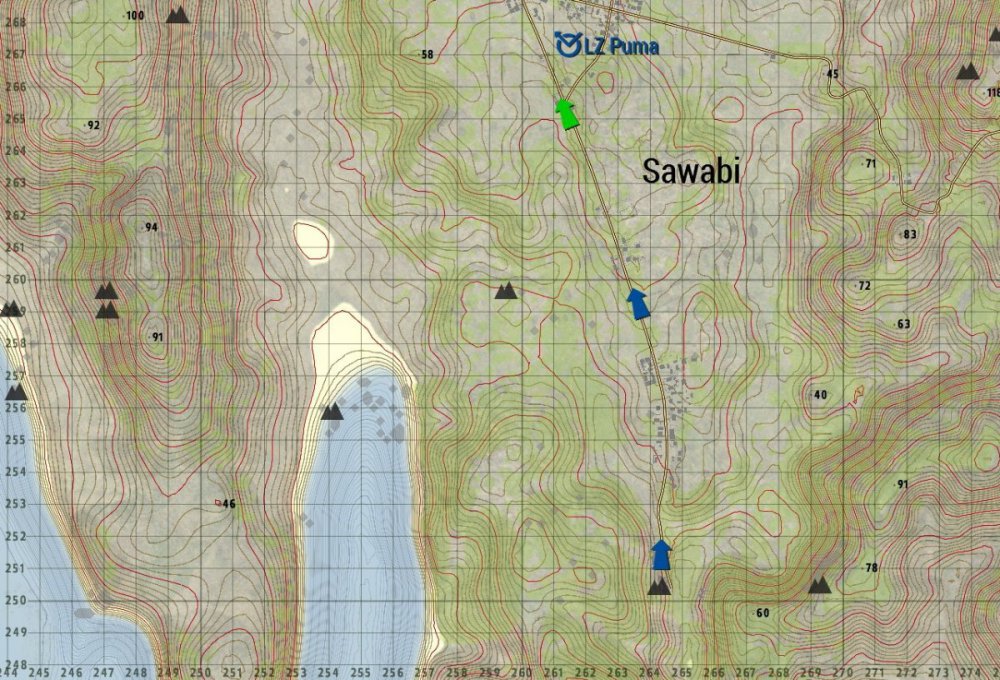
Phase 1:
Avenger company will be flown to LZ Tiger (257-239). From there they will move North to assault through the town of Sawabi (OBJ Wasabi). 1-1 and 1-3 will be responsible for the East side of the road, while 1-2 and 1-4 are on the West. Once the platoon has reached LZ Puma (261-267) the platoon will split up. 1-1 and 1-3 will move along the road to the Northeast, while 1-2 and 1-4 will move Northwest. Once LZ Puma has been secured, the 101st will be called in to hold defensive positions to prevent enemy reinforcements coming in from the East. The platoon will move along their respective routes until they reach the 285 Northing, which will be the limit of advance for this stage.
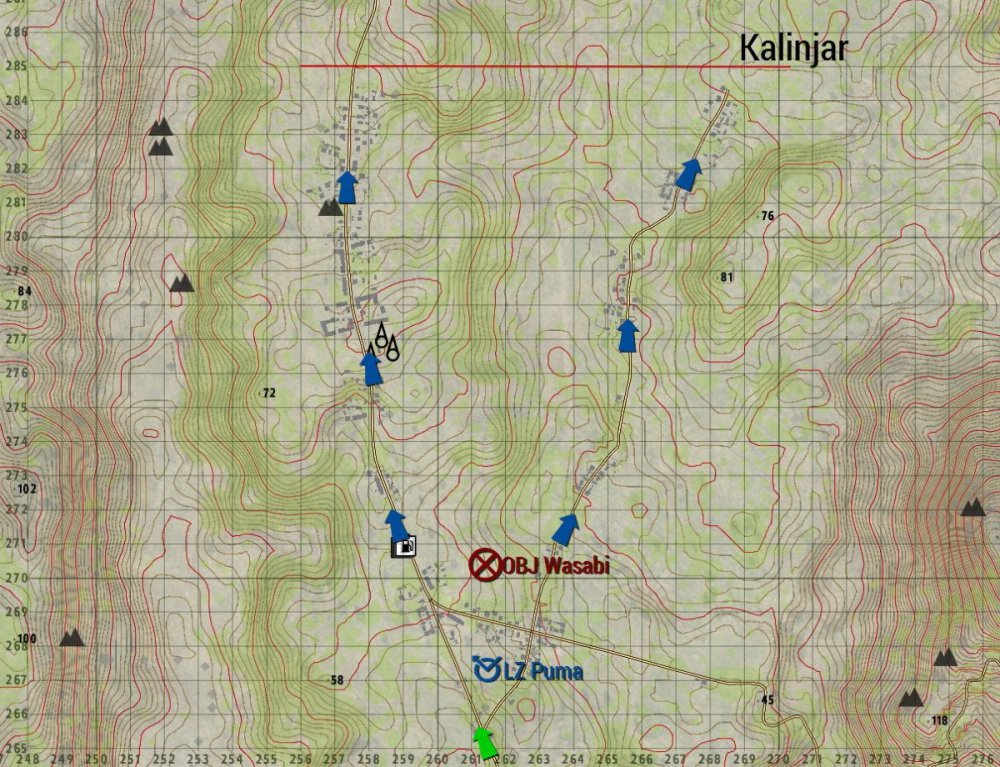
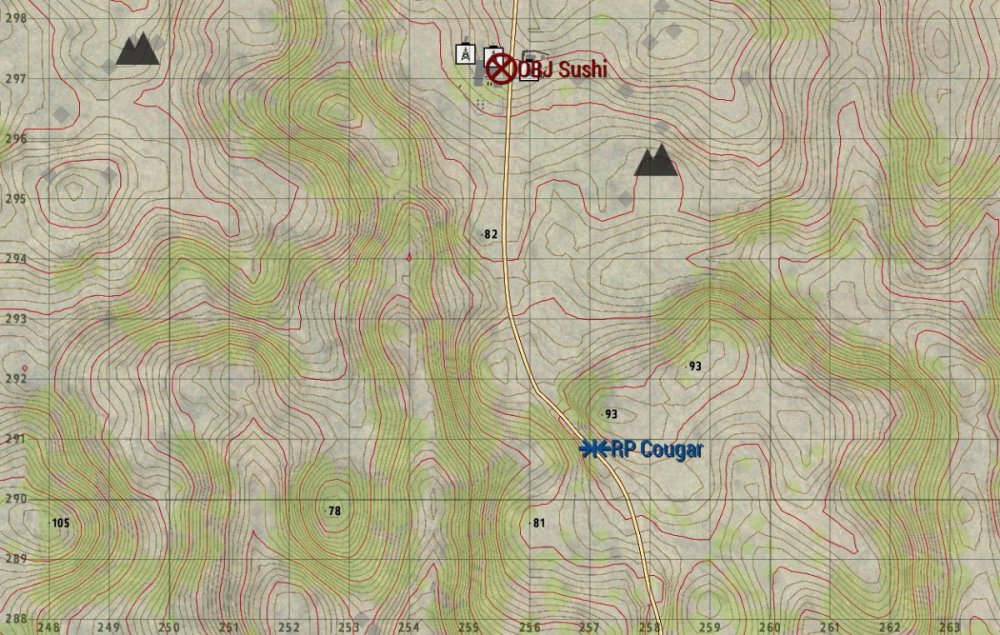
Phase 2:
Phase 2 will be the defence of OBJ Wasabi, and the assault on OBJ Sushi (255-297). When OBJ Wasabi is secured 1-1 and 1-4 will establish an OP at RP Cougar, while 1-1 and 1-3 move to LZ Puma. This position will be where 1-2 and 1-4 wait to see where the counterattack is coming from, while 1-1 and 1-3 act as a movement force to move to meet any hostiles that may be trying to go around. 1-1 and 1-3 will also be trying to locate any vehicles we can use for transport to reach the next OBJ. 1-4 will engage any targets they can see at OBJ Sushi during this time. When we are reasonably sure that there are no more reinforcements, 1-1 will move into the treeline to their West and advance North to OBJ Sushi. 1-1 and 1-3 will follow once they are done engaging any hostiles. 1-2 can start taking the OBJ on their own if they thing they are able, or they can wait until 1-1 and 1-3 reach them. Once OBJ Sushi is secure,
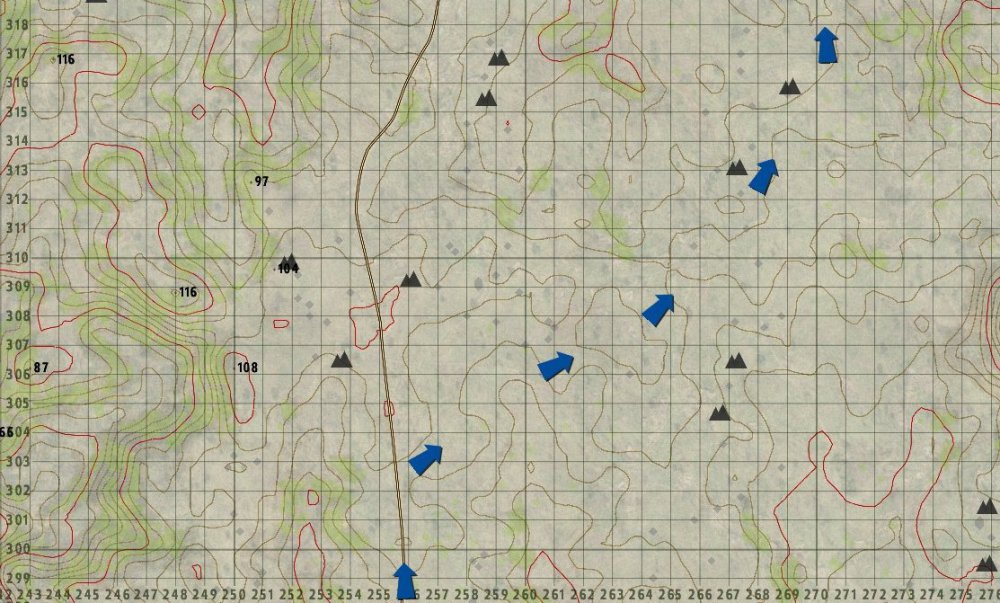
Phase 3:
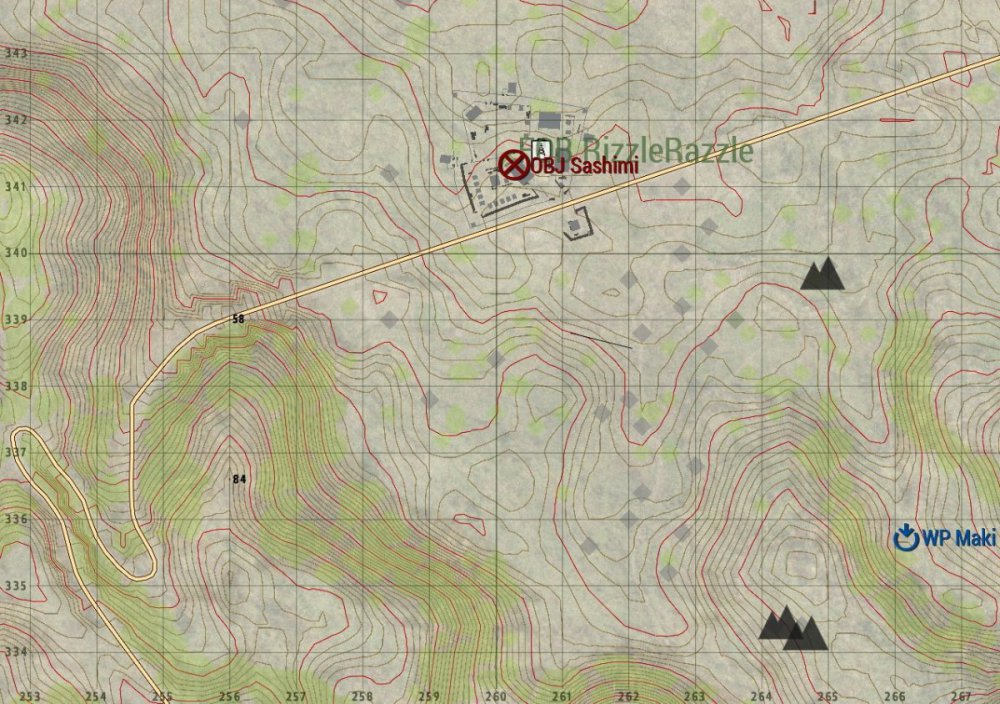
Phase 3 will be the movement to WP Maki (266-335). If the platoon is able to secure enemy vehicles to use as transport, they will drive along the route behind hills to prevent OBJ Sashimi (260-341) from spotting them. If there are no enemy vehicles to be used, air transport is to be called in and they will be flown to LZ Leopard. From there Avenger will move East over the hill, then North and follow the route to WP Maki.
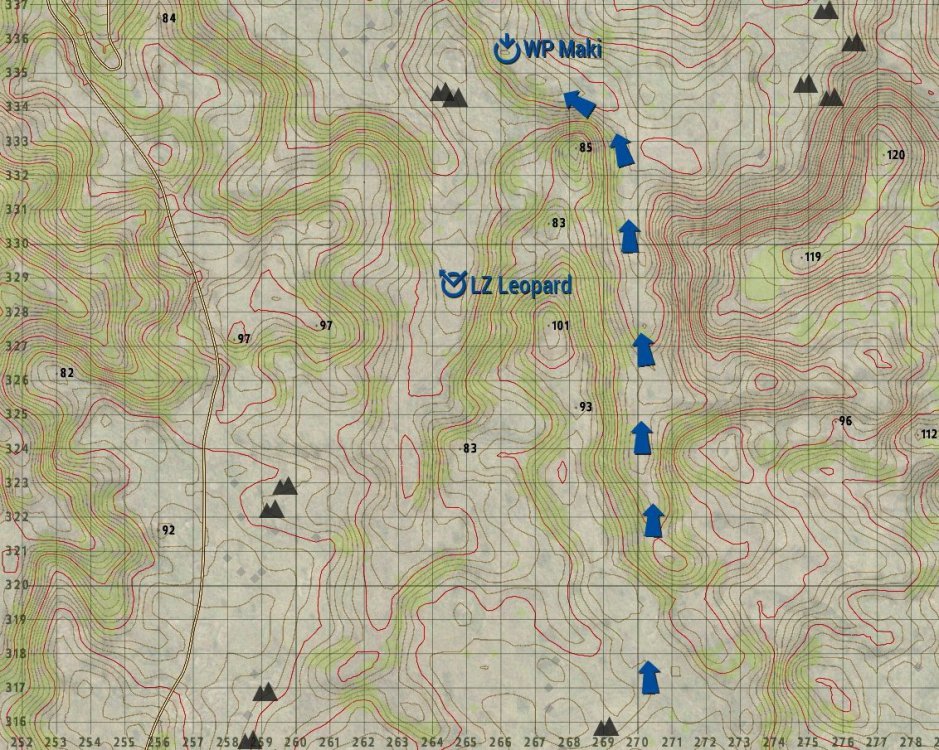
Phase 4:
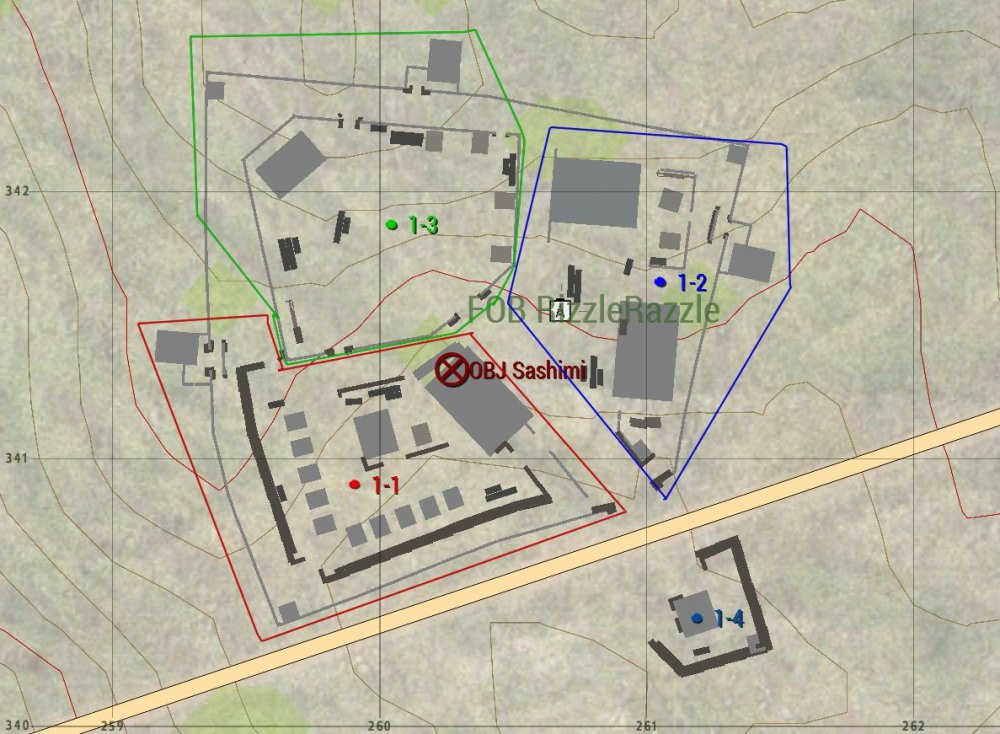
Phase 4 will be the assault on OBJ Sashimi (260-341). From Maki, Squads will bound through the rocks until they reach a position they can engage the tower on the South side of the OBJ. This tower and the immediate surroundings are to be captured first and 1-4 is to establish a firing position on top. The rest of the squads will breach the Front gate and begin clearing their respective areas, with 1-1 clearing the Southwest, 1-2 the East, and 1-3 clearing the North.
Task To Supporting Units:
ACE:
Provide transport for platoon
Provide on-call CAS
Provide resupply if needed.COORDINATING INSTRUCTIONS
Uniform and Equipment:
Refer to Infantry SOP located here: http://72ndairborne.com/ipbdev/index.php?/perscom/document/23-sop-2-1-infantry/Commander's Priority Intel Requirements:
Notify Platoon Leadership immediately if any intel is obtained.Risk Guidance:
ROE is weapons cold until ordered.Specific Priorities In Order Of Completion:
Insert
Assault Sawabi
Defend Sawabi
Assault OBJ Sushi
Secure OBJ SashimiSUSTAINMENT
Transportation:
Heli, Heel-toe express, captured vehicles.Medical Evacuation:
MEDEVAC will be availablePrisoners of War:
Any prisioners of war are to be extracted at the earliest possible time.COMMAND AND SIGNAL
Frequencies:
Alpha Company Command net: LR FREQ 32
1st Platoon Command net: SW FREQ 106
Avenger 1-1 net: SW FREQ 101
Avenger 1-2 net: SW FREQ 102
Avenger 1-3 net: SW FREQ 103
Avenger 1-4 net: SW FREQ 104
Air-to-Ground net: LR FREQ 40
Convoy Net: LR FREQ 30
SF-ODA 072 net: SW FREQ 107Callsigns:
CPT N. Icomach 'Avenger-6'
1LT Z. Katz 'Hitman-Actual'
1LT A. Fortnum 'Avenger 1-6'
SSG A. Razgriz 'Avenger 1-1'
SGT R. Vann 'Avenger 1-2'
MSG R. Garich 'Avenger 1-3'
SSG C. Davison 'Avenger 1-4'
1LT A. Guard 'ACE-6'
SFC K. Hargy 'ACE-7'Chain of Command:
1LT A. Fortnum,
MSG R. Garich,
SSG A. Razgriz,
SSG R. Vann
SSG C. Davison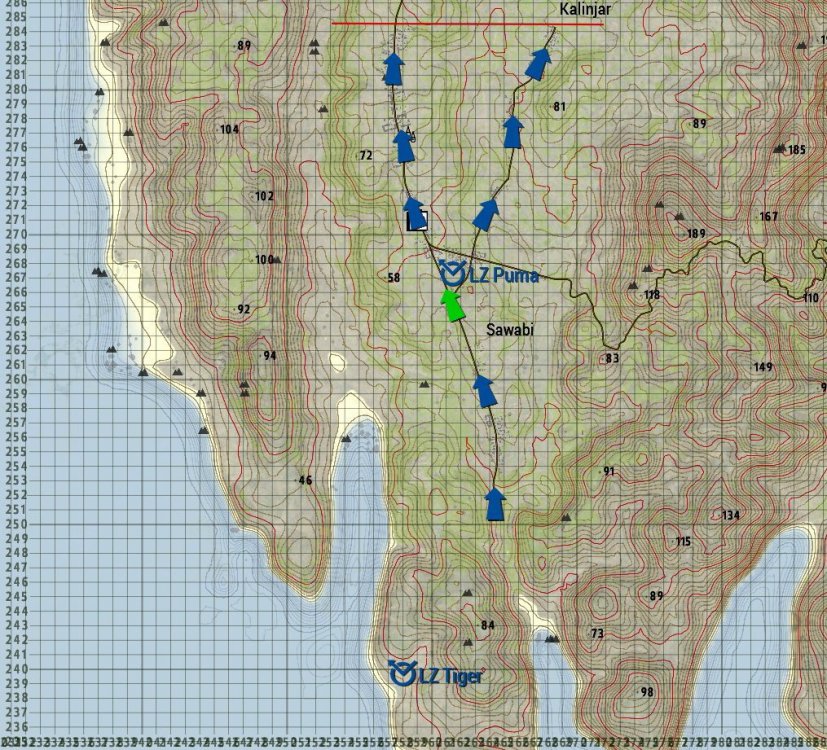


Stand Down 2: OP Retake Altis
in Warning Orders (WARNOs)
Posted
Warno states blocking positions at OBJ Bear and Coyote, but you put OBJ Crocodile instead of Coyote.
Assuming infantry is starting on the carrier and needs to be airlifted?